Whether you live in Zone 3 or Zone 8, you may be able to further stabilize the microclimate in your high tunnel with some simple modifications. Some of the changes we have made to our high tunnels are applicable to most climates. Others are significant changes, most suitable for growers with predictably cold winters. What works for us may give you other ideas to experiment with in your setting.
At our market garden in Lake Elmo, Minnesota, we expect to experience -35°F to -45°F occasionally, have about 22 cloudy winter days per month and still are able to produce hardy greens all winter. These include ‘Vita Green’ spinach, several kales, lettuces, salad pea tops, and more. Although we live in a Zone 3-4 climate, we have found how to make a hoophouse into a Zone 5 microclimate and then extend it by following Eliot Coleman’s methods in The New Organic Grower, Four Season Harvest and The Winter Harvest Handbook. As a result, his information on planting dates, hardiness of plants, etc. works very well for us. He saved us a lot of experimenting.
We developed our systems in three structures: a 10x16 “underground” greenhouse; a 21 x 25 tunnel that is 8’ tall; and a 32 x 60 high tunnel. Originally we kept the lower tunnel at 25°F or warmer with a wood stove, as our dwarf peach and fig trees are in it. We no longer need to heat this low tunnel in winter because of a few “small” and several significant changes which make this possible. Our 32 x 60 high tunnel is also unheated.
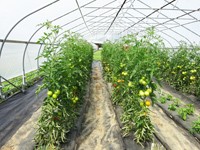
In our 32 x 60 high tunnel we have nine raised beds approximately 30 inches wide and eight 12” walkways. I have marked off a 10’ PVC pipe with these measurements so it is easy to set up. All walkways are covered with 3” of mulched leaves and grass clippings in late October and late June to help conserve moisture and maintain more even soil temperature. We have a bed along each sidewall and the first walkway starts 31” in from the wall. I dig that walkway about 8” deep to increase headroom. Other walkways are dug about 5-6” deep each year prior to the winter planting. At that time we add 2 inches of rough compost and cover it with the soil from deepening the walkways. This maintains the red wiggler worm population. The walkway soil is not laden with weed seeds as it has come from the sides of the beds over the past year. The beds run east and west and the tops of the beds are sloped so the south side is about 3 ½” lower than the north. If you toss the soil from the walkway on the north side of a bed to the south, you get some of this slope naturally. This makes the winter sun angle equal to about 500 miles further south for increased light and radiant heat absorption.
The soil in the first outside bed on each side may freeze some during the winter so we use them for root crop “storage” and only cover them with a floating row cover. By early February, they are thawed.
There are seven inner beds. The northernmost inner bed has ‘Seascape’ strawberries, a day-neutral variety that produces from April through November. The other six inner beds are treated as pairs and provide the winter production. After fall planting, each bed has its own set of 9-gauge wire wickets and an 85% light transmission, 60” wide floating row cover. The cover is kept on most days after mid September. In the winter, if there is a forecast of three or more consecutive cloudy days and daytime highs below 0°F we will lay a second row cover over the pair of covered rows. It is a two-person job to put on this 104”-wide row cover.
By early November, we put up ½” x 10’ PVC hoops over each pair of rows. The ends are pushed directly into the ground, resulting in a hoop that is 38-40” high in the center, low enough that a 9’ wide piece of 1 mil clear poly will cover it. Since there is no wind inside the high tunnel, it is just laid on the PVC, but the center part of the ends are tied to hold it tight. This is accomplished by wrapping a golf ball or similar sized smooth stone in the center end to form a small “bag” around it and then tie it off with a twine. The twine is attached to a stake about 6” from the last PVC hoop. This allows the poly to easily slide to the top center when we need to work in the beds, or it can be pushed to one side of the hoops and stay out of the walkway. With care, this poly will last two years but does begin to yellow. I have found one source for non-murky, truly clear 1 mil poly and that is made by Polar Plastics Inc., Oakdale, MN. Menards, Inc. is their only retail seller and they will ship anywhere. They also make a .75 mil, 12’ wide clear poly which we use on the end walls. I originally tried 3 mil greenhouse poly but felt it cut out too much light and caused the plants to stretch too much. It also was too bulky and did not stay up and out of the way on the hoops as well as the clear 1 mil poly.

Heat storage, insulation
To help maintain a more even temperature, black-painted 5-gallon pails of water are placed in the bed along the south sidewall. These need to be set on short lengths of 2 x 2 lumber, which creates a cold transmission break between the pail and the soil. Because the pail isn’t in contact with the cold soil, the water warms up faster in the sunlight. I plan to experiment with black painted ½ gallon or gallon plastic milk jugs of water in the center beds.
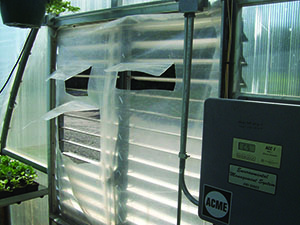
We loosely cover the inside of the air intake shutter with 6 mil poly so that it will still open and close. Then we cut three flaps, each about 8” x 12”, to let air through. Two of the flaps are cut near the top, one on each half and a third starts several inches below one of the top ones. Each flap is cut into the poly by cutting only the sides and bottom so when air is not coming in, it will hang closed, as shown below.
In late October we surround the hoophouse with a 4-foot-wide strip of leaf/grass mulch that we get from a local landscaper. The mulch is about 18 inches deep next to the hoophouse, tapering out to about a foot deep. Even when compacted by snow, it reduces the frost penetration into the hoophouse.
Now for some of the major changes we made due to our colder winters. The most significant change was to create a dead air space in all of the walls, doors, vents and roof of the high tunnel. This is a change one makes when replacing the poly. Simply put on two layers and then create a 4-6” air filled space between with a bathroom vent fan or commercial greenhouse fan designed for this. The double-inflated poly reduces heat loss significantly, decreases wind whipping of the poly and facilitates snow removal in the winter.
The endwalls are made of vertical 2 x 4s with 2 feet between. The outside is covered with the normal 6 mil poly. By mid September a single layer of the .75 mil clear poly is attached to the inside with a few staples to temporarily hold it in place. 2x2s are then screwed to the 2 x 4s and this holds the layer of poly in place. A screw every 4 feet is enough. Now another layer of .75 mil clear poly is put over the 2 x 2s. This is attached with a few staples and then held in place with lath nailed to the 2x2s. Three lath nails per lath is enough. Nylon or plastic strapping with ¼” or 3/8” staples can be used instead of the lath. A friend uses old drip tape as the strapping. The result is two dead air spaces in the walls. These two layers of .75 mil plastic generally need to be replaced each year.
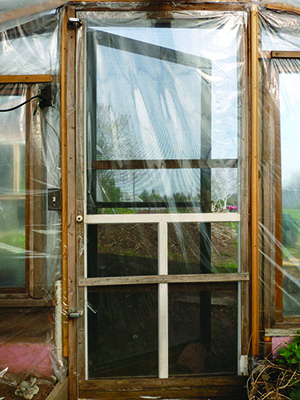
A double door system, shown at right from the inside looking out (with outer door opened to make it more visible in the photo), is made from a full window, regular combination screen door on the outside and a wood-framed screen door on the inside. The inside door is then covered on both sides with pieces of a crystal clear tarp or other high light transmission but durable product to create a dead air space within that door. Ensure that both of these doors are sealed at the frames so that a second dead air space is created between the two doors. These doors must seal well. Also, there should be no air leaks anywhere else. It is important to have only controlled air exchange.
The intake shutters and fan shutters closed well, but with only one layer of metal it was a significant cold spot. The single layer of poly mentioned above makes a big difference but to better control the air exchange, we built a 2” x 2” frame which fits around the outside of both intake and fan shutters. They have L metal gusseted corners. A piece of heavy, nylon reinforced poly then covers the frame. To make a better dead air space covering yet, just add a second 2” x 2” frame and a second piece of poly. Keep both pieces tight so the dead air space is maintained. These are put on after the fans are done running for the day and taken off before fans will run again. Even if they are on only “last thing in the day” to “first thing in the morning” during the coldest days of winter they make a big difference. We keep a ladder by each. An option to this, which would be less work, more cost and less air exchange control, would be to make an extension to the current shutter frame and add a second motorized shutter on the intake and second shutter on the fan. This second set of shutters should be taken off between mid April and mid October.
If you can scrounge some thermal pane windows you can facilitate extra light transmission and heat retention. The extra light seems to be worth while. If you can’t get free windows, then a piece of crystal clear 30 mil tarp can be used to replace a portion of the 6 mil outside poly on the end walls. If the windows are wider than 2’ you may need to add 2x2s on the frame to ensure keeping the air space between the inside layers of poly as they expand and contract in the winter. Maintaining the double dead air space is critical.
We have made other modifications to our 21’ x 25’ low tunnel to keep it warmer. It is a smaller area to maintain a microclimate. The side walls are 4’ high and then the hoops raise another 4’ making an 8’ high ceiling. With only 4’ sidewalls we have a raised bed against each wall and dug the walkways a little deeper. It has the double inflated roof and wood rather than metal purlins. We loosely loop an additional layer of 1 mil poly on the ceiling to create a second dead air space. Lath is nailed to the wood purlins to hold this poly in place. The low temperature inside the low tunnel this past winter was 13°F when it was -32°F outside. The beds with floating row cover and plastic covered hoops were considerably warmer.
Around the perimeter we dug down 24” and installed 1½ inch rigid foam board insulation to create a frost break. This rigid foam board insulation extends above ground 12” on the south side, 16” on the ends and 48” on the north side. It lies against the sidewall frame and is supported by it. On the north side the balloon roof starts at the top of the sidewall, continues over the top and down the south sidewall, ending 1’ above the ground at the rigid foam board insulation. All of the above-ground foam board gets covered with mulch in late October. A friend has high tunnels with 5’ walls. He covered the north wall with wood and then had 3” of foam sprayed on the inside. This he painted white for light reflection and it works well.
To increase light reflection we have added ½” aluminum coated foam board insulation on the inside of the north sidewall. The shiny side is to the plant side.
Our prevailing winds in the winter are from the north and west and we have a nice windbreak there. A little research on the internet will give you guidance on how far away to plant the windbreak and heat savings and crop yield increases you can expect for your part of the country.
If I had the room and knew then what I know now, our low tunnel would have been built to be movable as Eliot Coleman describes in The Winter Harvest Handbook. It would make it so much easier to switch from cold to warm season crops in early April. The peppers, tomatoes, cucumbers and salad pole beans could be kept in the 55-85°F range and the cool season crops could be outside.
We hope this information will generate ideas that will help you.
Donald Slinger, along with his wife Jeri, runs Slinger’s Apiary in Lake Elmo, MN. He started selling honey and produce as a child in 1961 and, as Jeri says, “it has gotten out of hand” as they now cultivate almost 5 acres of grapes and market garden by themselves. They sell at the Stillwater Township Farmer’s Market and to select pick-your-own customers. Don teaches a variety of classes on the outdoors, sprouting, hoophouses and extended season gardening.


 As soon as we start driving our routes in the spring our customers ask us when we’ll have roselilies. They’re that popular and have become a signature crop for us. They’re basically a type of oriental lily, but with multiple layers of petals, and without stamens and pistils (i.e. no pollen!).

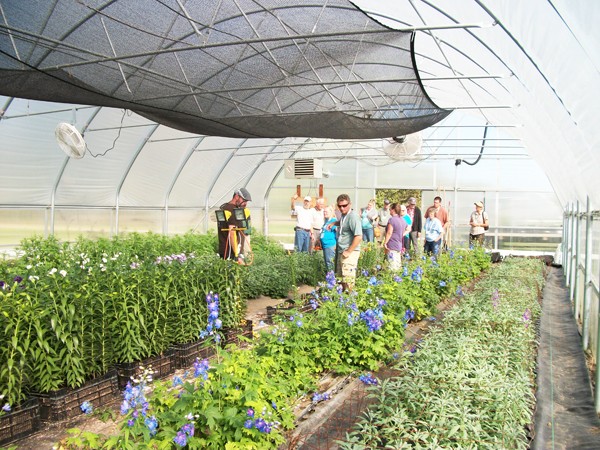 Prairie Garden Farm has been growing cut flowers for florists and studio designers since 2010. As we’re on an exposed hillside in west-central Minnesota, we’re dependent on protected culture to grow quality flowers. This article describes our approach – planning, financial, and operational details - that helps us make the most of our structures.