With our last frost date fast approaching, we’ve kicked it into high gear in order to have our soil ready for spring planting. While most vegetable farmers understand the importance of healthy soil, I’m often surprised by how little most flower growers know and invest in their soils’ health. I believe the old adage “it starts with the soil” always applies, regardless of the crop.
We pull an insane amount of flowers out of our land. With so much volume going out the door, we must work diligently to not only replace the biomass but to also continue building and improving the soil each and every season. Cover crops, purchased and homemade compost, rock powders, natural fertilizers, mulch, compost tea and various foliar treatments are all part of our fertility arsenal.
Our soil is very sandy and while wonderful in early spring when most other fields are unworkable, it definitely comes with its own set of challenges. In addition to being very hungry, it also has difficulty holding water and holding onto nitrogen. I often feel as if we’re feeding an elephant with the amount of organic matter that is required to get a bountiful crop!
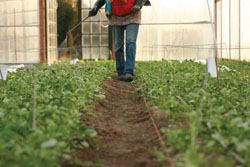
Before each bed is planted, we top dress it with 3-4” of compost and a generous application of a high quality organic fertilizer (9-3-4) made from bone meal, cottonseed meal, feather meal, kelp meal and rock powders. If the bed isn’t then covered in landscape fabric, the plantings are mulched with pea hay, shredded leaves or grass clipping to help retain moisture. Once plants are in and growing we feed them with a weekly application of compost tea, fish emulsion and kelp.
Every other fall I take soil samples of our fields and have them sent off to a local lab for testing. The information from the test gives me a broad overview of where I’m at and where I want to be in regards to fertility. A good soil test normally runs around $50 and is money well spent in the long run. It generally measures everything from the percentage of organic matter in the soil, the pH plus any lacking or overabundant trace minerals. A good soil lab will also give you an application recipe to bring your soil into good working order. Along with my sample, I always include what I’m growing and that any fertilizer or mineral recommendation needs to be from an organically approved source. So far my local lab has always been happy to oblige. Once I have the information from the test, I then set about making improvements. This fall the soil test showed our new dahlia field was a bit too acidic, low in calcium, manganese, boron and organic matter. With the amendment recommendation from the lab I was then able to have the local feed store custom blend the recipe and deliver the needed amount in a huge, 1 ton drop spreader to be pulled by our tractor. I’m curious to see how much of an improvement we get in that plot this summer!
After we add the amendments recommended by the soil lab, a fall cover crop is always sown. This “green manure” keeps the soil covered during the winter and helps to prevent nutrient leaching so common in our sandy soils. Depending on the variety selected, cover crops can add biomass, nitrogen, minerals, nematode suppression and even beneficial insect habitat. I generally plant a mix of annual rye for weed suppression, quick growth and cheapness of seed along with fava beans, red clover and field peas for nitrogen. If I can find oats and wheat I often add them to the mix for more diversity and to be used as early spring cuts. During the summer, when a bed is empty and will be for more than a few weeks, I like to plant a quick crop of buckwheat to help smother weeds and add biomass to the soil.
 In years past we have relied solely on purchased compost from our local municipal green recycler and a nearby dairy farm. From the recycler I can get dump truck loads dropped in my back field for about $15 a yard, delivery included. The dairy farm is a bit more spendy, at $30 a yard but their compost is about ten times more potent. I know of a few growers who use humanure from their city’s waste treatment plant with good success as well. In our area it can be had for free (you haul) or if delivered, at less than $5 a yard. I looked into it as an inexpensive, weed free option but my organic certifier quickly pointed out that composted human waste is not allowed in organic production. Truthfully, I was happy to hear that since the thought of shoveling manure, from humans, seemed a whole lot creepier than from cows.
This summer, in an effort to make our little farm more sustainable, we embarked on the crazy, fun and totally nasty adventure of hot composting. In years past we’ve made compost piles here and there with leftover garden waste but none ever got very warm and were basically just mounds of rotting debris that eventually, a year or two later, became useable. But this time we wanted a different experience, this time we actually wanted to learn and possibly master the art of compost making.
Wanting to “do it right” I checked out a big stack of books from the library, scratched down a whole bunch of notes on the nitrogen vs. carbon ratio and figured success was inevitable. For our nitrogen source (the heat of the pile) we used green garden waste, grass clippings and the bedding from our little chicken coop. These combined with old hay, leaves and dry weeds at the percentages outlined in all of the books (30/1 carbon/nitrogen) just didn’t give us the needed heat necessary to make killer hot, weed-free compost. No matter what we tried we just couldn’t get it very hot at all.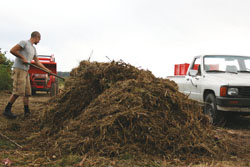
Now, every book strongly warned about the bad side effects of using too much nitrogen, especially meat products. So, for a while we steered clear and kept adding more grass and more manure without any more luck. I had heard of some local farmers who used ground-up fish to heat their compost piles with great success. So in an act of desperation I ditched the books and went in search of fish, lots of fish. I bet I called every cannery and seafood processing plant within 100 miles of us. Each time starting from the beginning, explaining slowly and shyly what I needed: heads, tails, guts…whatever they were willing to part with. Finally, after a morning of dead ends, confused receptionists and amused managers, I finally found someone who was willing to work with me. He was pretty suspicious at first but after going into great, passionate detail about my composting dreams and plans he finally caved and arranged for a morning pickup. The look on the employees’ faces as we pulled out with a huge plastic tote of sloshing guts in our dingy little pickup was priceless! I’m sure they all thought we were crazy, but who’s to say we aren’t.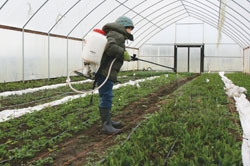
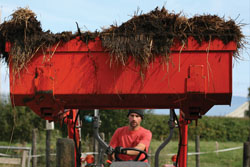
Once we had a steady stream of fish, we were in business! While exciting, this unlimited supply of nitrogen left us scrambling for way more carbon. A quick flip through my phone book and a loop around the neighborhood scored us 4 pickup trucks of moldy hay, 6 pickup trucks of horse manure w/straw, 4 pickup trucks of horse manure with sawdust, 1 pickup truck of old leaves plus the enormous mountain of weeds and flower clipping (probably 6 pickup trucks total) we had stashed here on the farm. In my “fish waste composting “research I only found one real reference to mix ratios. A company in Alaska was layering 3 parts wood chips from a logging operation with 1 part fish waste from the canneries and getting a nice, steady temp. So, we quickly copied their ratio and got to work.
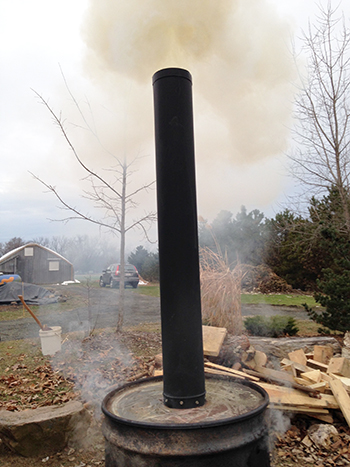
Because it was impossible to really measure exact amounts while building the 70’ long windrow, I roughly estimated for every 1-1.5 ft. of carbon (sawdust/horse manure, leaves, dry weeds) we would spread on a light layer of fish waste. So, for the better part of two afternoons, we mowed, dashed from stables to barns and regularly refilled our fish gut supply. Alternating thick layers of dry material with green garden scraps and then fish, we layered and layered until the pile reached about 6’. Once at max height we sat back and let it start cooking. Boy did the fish do the heat trick! Within about 12 hours the compost pile was already at 148°F and by the third day it reached 170°. Once our ideal temp range for killing weed seeds and pathogens was met (145-168°F), we turned the pile every two days for roughly a week and then weekly for the next month. What amazed me the most was that after just 3 days at 165° all of the fish waste (six 4x4’ totes) had disappeared without a trace. Not a bone, a tail or a gill in sight! 
In February the compost was spread in all of our new greenhouses. So far the plants seem to LOVE it! I’d guess from the 70’ windrow we ended up with about 15 yards of really nice compost. While much more time consuming than just buying it in already made, the process was really quite fun and oh so rewarding! As soon as we get a little more garden debris rounded up, we’ll be back for another round! In other areas of the country, where fish isn’t available, things like brewery waste, poultry bedding and manure are all viable options to help heat your pile for free.
In the spring, after the cover crop has been tilled in, the beds have been fertilized and top dressed with compost, all of the newly planted babies are then given another treat, a foliar application of compost tea. Starting shortly after seedlings emerge in the greenhouse, weekly doses of this magical elixir are applied up until flowering begins. Full of all kinds of beneficial critters (microbes & fungi) we also mix our compost tea with fish emulsion, cold water kelp powder, humic and fulvic acids, molasses and azomite rock dust for additional trace minerals. Once plagued by powdery mildew and botrytis, our plants now are much healthier and more disease resistant than before we began religiously using compost tea.
A few seasons ago I invested in a fancy and quite, ahem, expensive professional 25 gal brewer. While a spendy investment, I have kept the tea brewer running round the clock for a number of seasons. I order in two special, very high grade composts just for the tea. The first is made using the biodynamic composting method including all of the preparations and the second is from a vermicomposter down in Oregon. Combined, these composts give our tea a really nice mix of fungal and microbial critter support.
Investing in something as intangible as the soil or plant health is a tough one. I’ll admit that walking down the rows, spraying a fine mist of golden liquid on newly emerging leaves or stirring grey rock powders into a bubbling plastic cauldron does seem a bit eccentric. But when you love something, you’ll do just about anything to help it along. Oh, the things we do for flowers! Investing one’s hard-earned money on a big pile of “black dirt” or a pallet load of amendments might not be wildly exciting now but in the long run, you’ll be generously rewarded.
Recommended reading
Teaming with Microbes by Jeff Lowenfels & Wayne Lewis
The New Organic Grower (chapter 10) by Eliot Coleman
Secrets of the Soil and The Secret Life of Plants by Christopher Bird and Peter Tompkins
Erin Benzakein owns Floret, a small organic flower farm in Washington State. www.floretflowers.com


 The impacts of climate chaos on Astarte Farm have forced us to look for solutions that provide increased long-term resilience in our soil systems, and biochar has shown good promise in moving us toward that goal. Biochar is a paradoxical substance. It is both an ancient agricultural practice developed thousands of years ago in the Amazonian Basin, and at the same time a relatively new approach to enhancing and stabilizing soil fertility.


 Marketing is the other half of the battle


 I have been following the flower farming adventures of Pamela and Frank Arnosky, owners of Texas Specialty Cut Flowers, from the start. Their wonderful monthly column here in Growing For Market spanned more than 15 years and eventually became two fabulous books, We’re Gonna Be Rich (out of print) and Local Color (still available from GFM). When I got wind that the ASCFG was hosting one of their four conferences at the Arnoskys’ farm this winter, I flipped a gasket. Visiting their famous operation has long been a dream so with a little nudging from Lynn, my husband Chris and I hopped a plane and ventured deep into Texas hill country to learn the secrets of successful flower farming from two of the finest masters in the biz!


