Over the years garlic has been a small but stalwart crop on the CSA farms that I’ve worked on, and on my own farm. Compared to many other crops, it grows easily and reliably, is adaptable to a variety of techniques, provides harvestable parts all through the spring and, when cured and stored properly, can be sold all through the summer, fall and winter.
On a small, hand scale it is easily grown intensively in a small space with minimal tools, and on a larger scale many farms take advantage of a variety of tools, hand and power, to streamline the growing, harvesting and curing. The cultivation of garlic is also very wide ranging, and the tools and techniques vary a bit from place to place, climate to climate.
With harvest and curing season upon us, I talked to a few garlic growers around the country, trying to understand some of the tools and techniques that are being used. This month, I’ll tell you about harvest, curing, and storage. In the August issue, I’ll write about planting.
Here are the growers I interviewed: Chet Byler at Straw Hat Farm in Montrose, Colorado; Avram Drucker of Garlicana in Southern Oregon; Fred Forsburg of Honeyhill Farm in the Finger Lakes Region of upstate New York; and Ed Fraser of Fraser’s Garlic Farm near Rochester, New York.
Harvesting
Garlic can be harvested at any stage. In spring, green garlic — eaten like green onions — can be pulled as a way of thinning the plot. The scapes that form on hardneck varieties can be cut and sold; cutting scapes also helps the plants put more energy into the bulbs. It can be sold as fresh garlic, when bulbs have differentiated cloves but tops are still green. Finally, fully mature garlic can be cured and stored for a long season of sales.
Mature garlic is ready to be harvested when it has five to seven wrappers. The number of wrappers decrease the longer the garlic is in the ground. Years ago, Jim Leap, who used to run the farm at UC Santa Cruz, gave me a few harvest tips. The first was to sample bulbs by slicing into them and then carefully counting the number of wrappers around the clove. Since then I’ve been using five to seven wrappers as my harvest point, which lets me lose two wrappers during the curing and cleaning stages, and still have at least three to five left in storage. The number of wrappers is also indicated by the number of living leaves, generally about three, but the count is more accurate when you actually cut into the head.
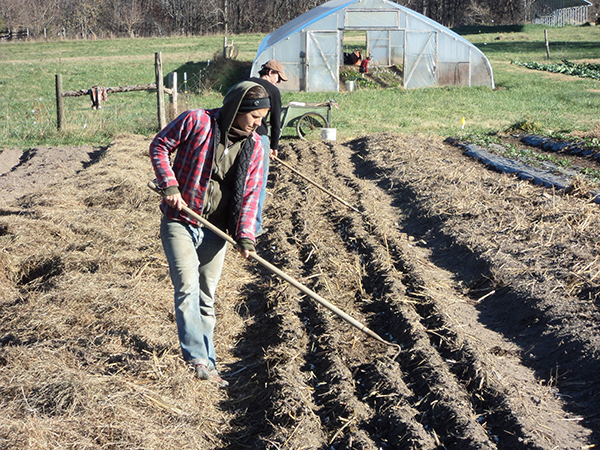
Most small growers just use spading or potato forks to loosen the ground and then pull the plants by hand. I pile the plants on carts for transporting back to the barn.
On a larger scale, Fred and Ed in New York State both use undercutter bars on the back of their tractors for loosening the garlic quickly. Fred got his bar from Market Farm Implement. Ed had his custom fabricated and puts up to 700 lbs on it and drives very slowly to keep enough down pressure to make sure that it stays at least 3” below the heads in the ground.
In the East, where it rains in the summer, there is usually sufficient moisture to allow undercutters to dig into the soil. Here on the West Coast it’s dry in the summer, and most farms I know usually dry their garlic fields down around harvest time, cutting off irrigation a couple of weeks before harvest. In dry areas, you should chisel the paths for the shanks on your undercutter bar before the soil completely dries out, usually about two weeks before harvest. This helps reduce the stress on the tool and also allows it to dig in better.
Curing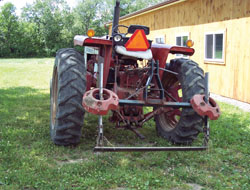
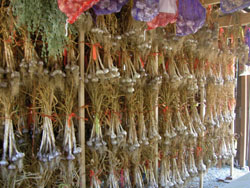
After harvest, garlic must be cured, or dried thoroughly, to prevent mold in storage. Chet Byler at Straw Hat Farm in Colorado uses a curing method similar to the method many farms I’ve worked on use. He ties the garlic into bundles of five and then hangs them to cure for 3-4 weeks in an open barn. I cure my garlic the same way, only I use long loops of poly twine which I then hitch two bunches of 6 heads to on either end of the loop. This allows me to hang the bundles over a barn rafter without any tying, and to reuse the same loops every year.
To improve air flow, the loops are long enough that I can offset the bunches, hanging one close to the rafter and the other below the first bunch. Creating the hitches takes most folks I’ve worked with a few tries to figure out, but once you learn, it’s very fast.
Avram Drucker also hangs his garlic to dry. He has 2 x 2 posts that run from the floor of his small barn to the rafters and then he ties multiple horizontal lines of poly twine from one end of the barn to the other. His drying rack is shown above right.
He also ties extra vertical twine between each post to keep the lines from sagging. Lines are spaced so that the garlic can hang between them, and five to six bundles of 12 garlic are hung on each line, between each 2 x 2 creating long alleys of hanging garlic. The bundles are either tied with twine, or zip ties, which are faster and easier on the fingers, but are not easily reusable. Air flow is key so he cracks windows and doors and runs a ceiling fan.
When I was at Sauvie Island Organics I designed a stackable 4’ x 4’ rack for harvesting and curing which I wrote up in the September 2009 GFM. Fred Forsburg in New York also uses racks, although his are 4‘ x 12’, have chicken wire bottoms and are stacked using cinder blocks to separate the layers and allow good air flow. I’ve always cured garlic with the tops on, but according to Fred there’s research that shows cutting off the leaves and leaving long stems is just as effective. He trims the tops before laying out the garlic on racks using Craftsman Handi-cut utility cutters and leaving about 3” of stem. Ed Fraser uses similar racks but he keeps the tops on. Some of his curing is done in a shady barn, but he also uses a hoophouse with shade cloth, noting that it’s important that the hoophouse not have any vegetation or moisture that reduces airflow and increases humidity, which can lead to molding. He also uses fans to increase air flow. If the weather allows, he likes to leave the pulled garlic in the field for a day or two before bringing it in. Conditions have to be dry for this to be possible. He lays the garlic out with bulbs in one directions and leaves the other direction to make it easier to pick up later.
Cleaning
Cleaning happens after curing and there is a bit of variation in methods and tools used from farm to farm. Some farms leave roots on, some trim them, some put extra effort into cleaning up loose skins and soil, some don’t.
Pruners and hands are the most common tools for trimming tops and roots and for cleaning loose skin and soil. Avram employs old tooth brushes to help with the cleaning process, using the hard plastic edges as much as the bristles to help scrape away soil and loose skin. He does trim roots, and if there is excessive soil attached to the roots he will spray them off with water before hanging them to cure. This prevents the pruners from having to cut through soil,which dulls the blades quickly.
Both Fred and Ed use old vegetable brush washers to clean their garlic. These are the type that are used for apples or potatoes and have a series of roller brushes with stiff bristles that gently tumble and convey the garlic through, rubbing soil and loose skin off in the process. Typically a washer like this is set up with spray heads, but they use them without any water, keeping the cured garlic dry to ensure good storage quality. Because Fred cures his garlic by trimming the tops first, keeping a good length of stem intact, he doesn’t trim further in the cleaning process, preferring to sell them with long stems.
Storage
There seem to be two schools of thought around storing garlic, both based on the same piece of information, which is that garlic is encouraged to sprout when it drops below 45°F. To avoid sprouting, both Chet and Avram try to keep the garlic in the 50-60°F range at about 50-60% humidity. Chet stores his in a basement with a dehumidifier which ensures the proper humidity. He is typically storing hardnecks into November and softnecks into January, but for personal use the garlic lasts much longer. Avram, using a similar approach, sells garlic into the following spring, with no sprouting problems.
Ed uses the opposite approach and gets the temperature down to close to freezing, at which point there is general consensus that garlic will store almost indefinitely as long as the humidity is in the 65% range. When the garlic comes out of cold storage it then is prone to sprouting so he lets his customers know that they should store it in the crisper in the refrigerator in a paper bag. With this method some of his customers report that they still have garlic into the following summer.
There is also general consensus among the growers that variety has a lot to do with the storability of garlic and everyone tries to sell their varieties that store poorly early in the season. Essentially, the tighter the wrapper on the cloves the longer the garlic will store in good conditions. Avram also points out that the ancestral growing grounds for different varieties points towards the optimal storage conditions, with some varieties coming from very dry regions, and some from wetter. For example, varieties that are from very dry regions are less prone to desiccation at low humidity.
Climate differences
Garlic growers in my experience are particularly passionate about their crop and love to talk about it. It is important to keep in mind regional climate variations and even variations from farm to farm in micro climates when talking about garlic methods. What works in the desert Southwest where the sun is intense and the humidity is extremely low is very different than what works in the Northeast where humidity can be very high. This is especially true about curing and storage. Ed mentioned to me that curing methods that work perfectly well for him don’t work for Fred because of the way water moves in relation to Fred’s hoophouse and barn. Even though they are both in upstate New York, they have to look at site-specific methods to cure their garlic.
Resources
The Garlic Seed Foundation, and David Stern in particular, was recommended highly by many growers as the best resource for garlic growers; www.garlicseedfoundation.info.
I have found Growing Great Garlic by Ron Engeland an excellent resource over the years and very readable. It is available from Growing for Market for $17. Subscribers receive the 20% discount, which makes the price $13.60 plus $5 shipping. To order online, go to www.growingformarket.com and log in under the Member Login box using the words print and member in the two fields. Once you see the page that says You’re Logged In, click on the Online store in the left column. You’ll see books listed with the regular price crossed out and the member discounted price above it. You also can order by phone at 800-307-8949 or by mail to GFM, PO Box 75, Skowhegan, ME 04976.
Josh Volk writes regularly about tools and equipment in Growing for Market. He farms on the edge of Portland, Oregon, and consults with growers around the country. Contact him at www.joshvolk.com.


 Garlic is a high-value crop and a heavy feeder. It needs full sun and a good range of available nutrients. Planting in raised beds helps soil drainage, reduces soil compaction and facilitates harvest. Garlic does best in a sandy or clay loam with very good drainage and lots of organic matter. Fall is the best time to add compost or other fertility amendments, such as soybean meal. Avoid over-fertilizing or the growth will be too tender to survive cold conditions, and the storage life of the garlic will be shortened. Avoid soluble nitrogen fertilizer in the fall to prevent leaching into ground water.


 Part 1 of this series discussed why and how to add cut flowers to your vegetable farm. This part discusses production in more detail, especially harvest and post-harvest handling. Part 3 will focus on marketing.
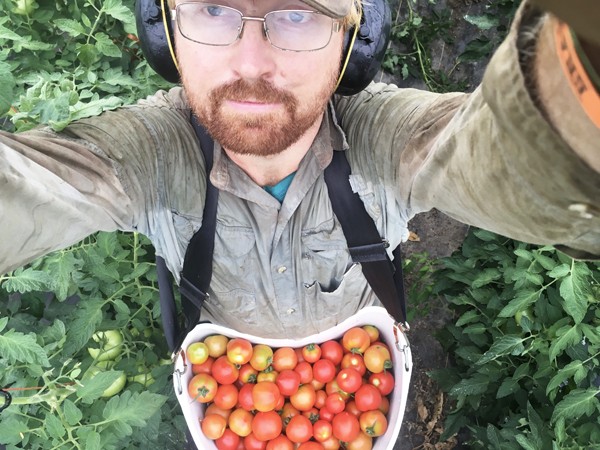 We regularly harvest into a half dozen containers on our farm. Bulb crates, flip-top crates, storage crates, pallet bins, five gallon buckets, and waxed boxes. Our new favorite receptacle, though, is vastly more ergonomic and hands-free, and has changed the way we pick several crops, making it faster and more efficient and enjoyable.


