In the April 2020 issue, Brett Grohsgal’s article “Breeding crops for resilience to a changing climate” and Fred Hempel’s “Breeding tomatoes on a farm: practical selection advice,” encouraged us to select varieties for certain traits or to breed our own varieties. Fred Hempel’s “On-farm tomato breeding: making crosses and managing projects” in May 2020 took the skills up a notch. In March 2009, I wrote, “An introduction to growing seed for yourself or for sale,” for small-scale growers venturing into seed growing. Now, I am tackling the question of how to extract, process and conserve seeds from your selected seed crop until sale or planting.
My experience is as a vegetable grower, growing a few seed crops alongside vegetable production. In this first article, I will focus on wet-seed processing and demystify fermentation and drying. An article in the September 2020 GFM addresses dry-seed crops (which develop in pods, husks or ears, and dry on the plant) and vegetatively reproducing crops (clones like garlic).
Ease into seed growing
In your first year, avoid unfamiliar crops or too many different seed crops. Grow one or two seed crops for yourself to see how it fits in with the rest of your farming.
Wet-seeded crops usually have ripe seed when the produce is ripe or a little beyond that. Cucumbers are a notable exception; they are eaten as underripe fruits, and the seed is mature when the cucumber reaches the yellow blimp stage. I think wet-seeded crops are less work. Dry-seeded crops can take a lot longer to mature seeds than to grow as vegetables, and then you still need to screen and winnow. Your passion for selecting a particular trait in a particular crop may be what drives your decision.
Pay attention to isolation distances because they can restrict what else you can grow as produce. If your growing season is long enough, you may be able to grow yellow squash for an early market, then sow pumpkins for seed, and before any pumpkins flower, ruthlessly pull up all the yellow squash. The various squash varieties can cross within the same family, so, if you want pie pumpkin seeds, you need to keep the zucchini away.
John Navazio’s book The Organic Seed Grower: A Farmer’s Guide to Vegetable Seed Production has everything you need to know. Keep records of your dates and the results you get, as timing is critical, and some crops will work better for you than others.
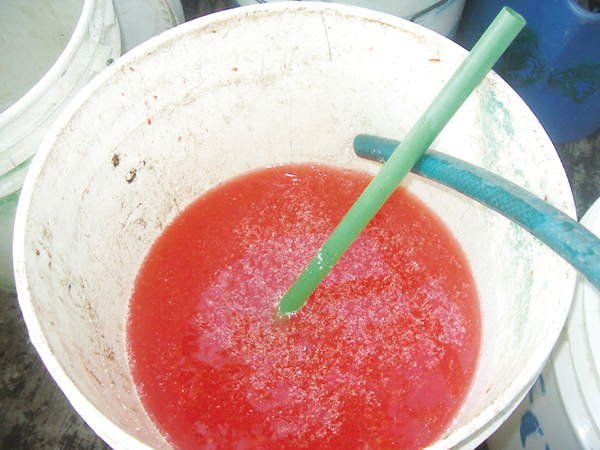
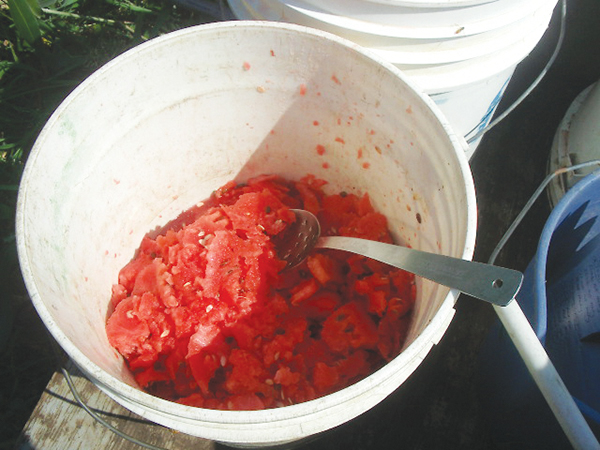
Even as the second round of rinse water is added to the mix of tomato seeds and pulp, most of the seeds are on the bottom of the bucket and obscured by pulp.
What type of crop to grow?
Choose crops that easily reach maturity in your climate. Be sure you have an open-pollinated variety. Seeds saved from hybrids produce very mixed progeny, some of it useless. Once you are experienced, you can develop stable strains from a hybrid over several years of work, but this is not the place to start.
Choose crops you only grow one variety of or pay close attention to the required isolation distance. Choose crops your neighbors don’t have growing the other side of your fence line. Plan to pace yourself by selecting crops with harvests at either the end of the main season, or weekly for one month only. Choose crops that grow without much attention in underused spaces, e.g., high summer in the hoop house for us in Virginia.
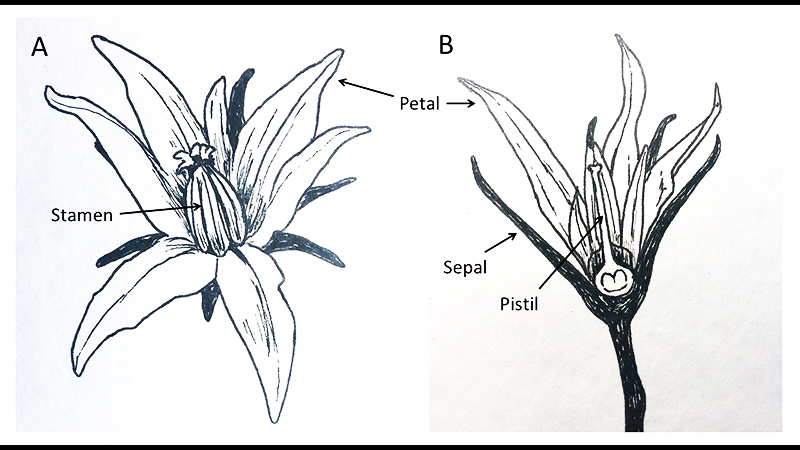
Self-pollinated crops are a good place to start seed growing because they often have good open-pollinated varieties. Self-pollinators have flowers which all contain both the female and male parts (botanically these are known as “perfect flowers”). Some self-pollinating flowers are self-fertilizing, while others are self-incompatible, and are insect-pollinated. Cross-pollinators have separate male and female flowers, either on the same plant (as corn does), or on completely separate plants. For example, spinach has male plants and female plants.

Fruit and seed from the same crop
Fruiting crops take a little extra time to fully mature the seeds and you may still be able to eat or sell the food in some form, for example, tomatoes, peppers, watermelon and winter squash. A grower I know had success with winter squash, selling a certain amount to restaurants each week after cutting the squash open and removing the seeds.
Getting two crops from one plant can take more time compared to simply mashing whole tomatoes. So, weigh the pros and cons of conserving the food. You may be able to harvest the earliest fruit, then stop and save seed from the later maturing fruits (cucumbers), or save seed first and harvest the later fruit.
Wet seed processing
Wet seeds are embedded in fruit. Wet processing has four steps: scooping out the seeds or mashing the fruit, fermenting the seed pulp for several days, washing the seeds and removing the pulp and then drying the washed seeds. Ferment the seeds long enough to release the clean seeds from the pulp without waiting so long that the seeds start to sprout. Wet-processed seed is naturally cleaned during the fermentation and washing. If you are breeding and selecting, you will likely be working with smaller quantities and using jars rather than buckets as I describe here.
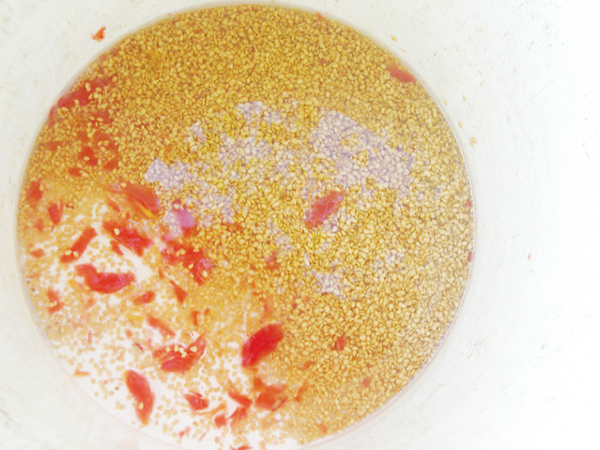
The tomato seeds are finally visible after pouring off the third rinse.
Producing tomato seeds
Roma is an OP paste tomato variety that had been reliable and productive for us (we make a lot of sauce, juice and salsa), but our yields were reduced by Septoria leaf spot. I couldn’t find a commercially available Septoria-resistant paste variety, so I decided to develop our own strain, selecting for resistance to Septoria, along with earliness and high early yield. The reward — healthy plants for a long season — is of great value to us.
We plant about 260 Romas, and probably save seed from a selected 130 to160 mother plants. For selection to improve the variety, it’s important to have plenty to choose from. Between 80 to 100 would be enough. We make sure when we plan our crop layouts that we don’t put any other varieties of tomatoes within 180 feet (55 meters) of any of our Romas.
We transplant in late April or early May, with a metal T-post after every two plants (the plants are two feet apart). We use the Florida Weave system, adding a new round of twine each week.
In early July, even before any tomatoes ripen, I start monitoring the plants once a week, using flagging tape on the T-posts, marking ones with healthy foliage and ones promising to yield very well. I tie the tape on the nearest post, with a bow on the side facing the chosen plant. I use red tape for high early yield combined with not much Septoria and yellow tape for healthy foliage with a decent yield. The star performers get both red and yellow tapes. I use Presco biodegradable flagging tape, made from wood pulp. It is nontoxic and degrades in six to 24 months (depending on conditions). The 3.0 mil non-woven cellulosic roll flagging is $2.59 from Gempler’s.
After a couple of weeks of monitoring and flagging, once the tomatoes start to ripen, I monitor and pick on the day before a crew bulk harvest; it’s no good looking for high yields when they’ve already been picked. I pick one or two fruits from each marked plant, maybe three from a plant with both tapes. If the plant no longer looks so great, I remove its tape. If a plant without a tape starts to excel in healthy foliage as the season continues, I add a yellow tape. Note: I don’t add many red tapes after the start of the harvest because I want to select for early fruit and plants that yield well later are not what we want.
Our method combines well with crew harvesting most of the fruit as food. If you are growing the variety only or mainly as a seed crop, you would mash all the fruit from the chosen plants and save all the seed. Or, if you are seeking to maintain an OP variety, (i.e. keeping the variety the same from year-to-year, without selecting for new traits), seed could be saved from the whole planting after pulling out any sub-par plants (known as “roguing”).
Processing tomato seeds
Basic equipment for wet-seed processing consists of buckets, knives, and spoons. I pick five gallons (19 liters) for seed each week, sometimes twice that. I store those buckets of tomatoes for five days in a secret location where no one will find and eat them, which lets the fruit get completely ripe.
I process seeds on sauce-making days (the days we do bulk harvesting). I cover the fruit with water to clean it, then remove and cut each tomato in half lengthwise into a clean bucket, rejecting any diseased ones. Using a soup spoon, I then scoop out the seeds into a clean bucket and put the empty “shells” into another clean bucket (to make sauce).
I ferment the seeds in the loosely covered bucket for three days at approximately 70°F (21°C). I aim to stir about three times a day.
I take several clean buckets and a sieve and wash the seeds. This art gets easier and quicker with practice. I pour from bucket to bucket, rather than onto the ground, so if I make a mistake, I haven’t lost the seeds. The best seeds sink. The floaters are not likely to be good, so don’t worry about losing a few seeds when pouring the rinse water off. The process is a matter of adding water, stirring, letting things settle, and pouring off the floating material. Here are the steps:
1. Pour off the top half of the ferment (mostly no good) into another bucket to salvage any good seeds. If in a hurry, discard the material from the top half of the bucket, provided it was well-settled.
2. Add water to both buckets, stir, let things settle and then pour off the tomato pulp and no-good floating seeds from both into another bucket for a second chance.
3. Consolidate the better stuff in one bucket, the worse stuff in another, let settle, and pour away the seedless water.
4. Add more water and repeat several times from step one.
5. After about five rinses, the water is clear and the seed is clean.
6. Strain it through a sieve.
7. Spread the seeds on paper towels on a tray for a few days with a fan blowing on them. Spreading them on a window screen propped on buckets also works well. Another option is to make small bundles in fine cheesecloth or row-cover scraps and tie them directly on to the fan casing.
8. After six to twelve hours, scrape the clumps of seed off the surface with a putty knife or spatula, turn them over and crumble the clumps by hand. I break up the clumps of seeds several times during the drying period.
9. After two days, once the seed is thoroughly dry, gather it into a paper bag and add some desiccant. The little packs from pill bottles or shoeboxes will work, or a sachet of dried milk powder, or you can buy silica gel beads. I hold back on storing in an airtight container until I’m sure the seed is completely dry. See the seed storage section below.
Usually I work with one or two buckets each week during August. For example: Harvest Monday, scoop Friday and start the fermentation, wash Monday, set those seeds to dry and harvest the next batch. Twenty gallons (four buckets) of tomatoes makes 130 grams of seeds. If necessary, I continue into the beginning of September. It’s not good to save seed from plants in decline, so get started as soon as you can, and quit while the going is good. We sell this seed to Southern Exposure Seed Exchange as Roma Virginia Select.
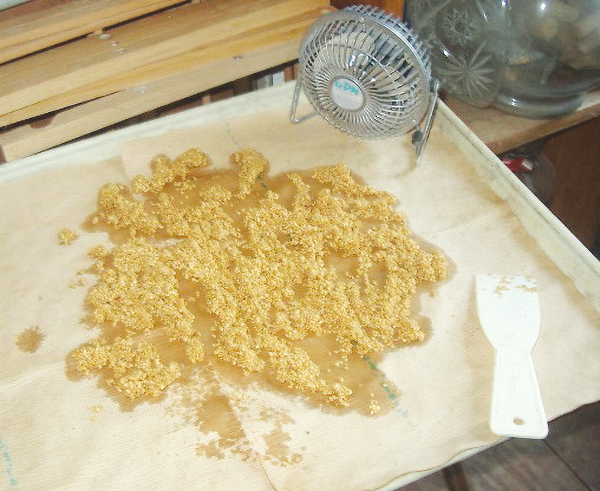
A batch of freshly washed Roma tomato seeds drying with a fan.
Producing watermelon seeds
We have been selecting Crimson Sweet watermelons for earliness, disease-resistance, flavor and large size. By never bringing other watermelons into our gardens we have avoided seed-borne watermelon bacterial fruit blotch disease. We make sure no one is growing any other kind of watermelon within half a mile, as watermelons cross-pollinate with each other (not with other types of melon). Even though they are cross-pollinators, cucurbits act more like self-pollinators genetically, so it’s actually okay to save seed from a fairly small population. They show relatively little inbreeding depression, and a population of 25 plants would be enough.
By transplanting, we have already started selecting healthy plants. Early in July, as the melons ripen, I walk through the plot with a grease pencil and write numbers on 30 to 40 large selected melons with vigorous, healthy vines.
I’ve tried other ways to mark melons, such as flags and magic markers, but grease pencils work best. Having a big number right there on the skin of the melon stops any crew member about to harvest it as produce. They know to never pick melons with numbers on them.
I keep a notebook to help me keep track as melons are easily lost in abundant healthy foliage. I write down which numbers are in which rows and how many there are in total. I keep notes of which numbers I harvest each week and assess them for size, ripeness, and, once I open them, flavor.
Ideally, watermelon for seed would be overmature by seven to ten days, but waiting too long is courting disaster. If the vine has died, I do not keep the seed, as clearly it wasn’t a healthy plant, and I’m selecting for disease-resistance. It can get hard to find all the numbered melons, but my notebook saves me from wasting time looking for one that I already harvested.
Once a week in August, I check for ripeness and harvest for seed. We do the “Scrunch Test” for ripeness after checking for brown tendrils: Put two hands spread out across the melon, press down quite hard, listen and feel for a scrunch, which is the flesh in the melon separating under the pressure. Rumor has it that it only works once, so pay attention. I discard any numbered melons that don’t look healthy or that don’t ripen early. I sometimes add a number to any huge, fast-growing melon that pops up after the initial numbering. Earliness is important to us, though, so I only harvest in the month of August.
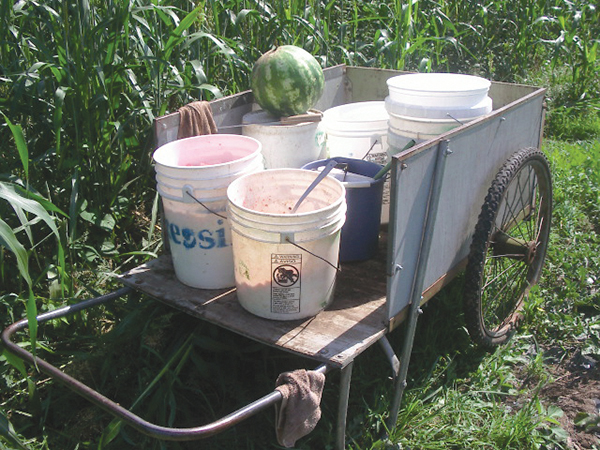
The author’s melon seed collecting cart and tools.
Processing melon seeds
I harvest about six to eight melons each week, as they ripen. It’s a messy job so take a damp cloth with you. I put all the clean buckets and large knives and spoons that I’ll need into a garden cart and pull it down the rows, checking and harvesting melons as I work along the rows. I make notes (by melon number) about size, then I cut the melon in half crosswise, observe the color, and take a big serving spoon and scoop out part of the heart to taste.
If the flavor is good, I scoop the (seedless) heart out into a very clean bucket, for us to eat later. If not, I don’t save its seeds. Next, there is a layer that is full of seeds. I scoop this into a seed bucket. Then I scoop the outer flesh, also relatively seedless, into the food bucket. The scooped watermelon flesh makes wonderful smoothies and sorbets. I pitch the empty shells back into the plot.
Fermentation is done the same way as tomatoes, but for four days at 70°F (21°C), stirring three times a day. Wash the seed on the fourth day in the same way as tomato seed. Dry on racks or trays with fans. Scheduling example: Harvest and scoop on Tuesday, wash on Saturday and set them to dry. They take longer to dry, being considerably bigger than tomato seeds. One Crimson Sweet melon provides 22 grams of seed; 22 melons provide one pound of seed.
Seed storage
Seeds must be stored dry, cool and airtight once dry. Make sure your storage places are mouse-proof. Preliminary storage can begin when seeds are down to 8 percent moisture; the seeds should break or shatter when you hit them with a hammer. They should not mash.
Put the dry seeds in a jar with an equal weight of a desiccant (silica gel or powdered milk). For USDA Certified Organic, check the OMRI list and only use allowed desiccants. After seven days, remove the desiccant and put the seed in a labeled bag inside a labeled glass or metal container with an airtight lid. You can seal the lid with Parafilm M tape.
For long-term storage, put the jar in the freezer. When removing seeds from the freezer, allow the container to warm to room temperature for a day before opening to prevent moisture condensing on the seeds.
A peek inside the author's bucket with scooped Crimson Sweet watermelon seeds and attached flesh.
Test your germination
Fold a thick paper towel lengthwise, unfold it, count out 50 or 100 seeds and spread them along the inside of the fold. Re-fold the towel, dampen with water and roll up loosely. Put the roll inside a loosely closed (not zipped) plastic bag and put it somewhere at a suitable germination temperature. Often the top of the fridge is suitable for a small-scale seed grower. Beware the top of gas water heaters as fumes inhibit tomato seeds and other nightshades.
See my book Sustainable Market Farming: Intensive Vegetable Production for ideal temperatures for different crops. For instance, 75°F (24°C) is good for most vegetables, 80°F (27°C) is better for tomatoes and peppers, 85°F (29°C) for melons. Open the roll twice a day (the air change helps the seeds even if it’s too early for sprouts).
After seven days, count the number of sprouted seeds and remove them. After another seven days, repeat and add this number to the first one to calculate your germination percentage. If you sell to a seed company, they will check germination before they pay you.
Pam Dawling is the author of the books Sustainable Market Farming and The Year-Round Hoophouse. She blogs at sustainablemarketfarming.com, on Facebook and for Mother Earth News.


 In the April 2020 issue of Growing For Market, I focused on the selection side of tomato breeding. In this follow-up article, I will discuss how to make crosses and manage breeding projects.
 Strategies to use on your farm: a breeder’s perspective
 Farmer to Farmer Profile
 I met up with Fred Hempel, the Artisan Seeds breeder, at his farm in Sunol, California on Sunday, October 8, 2017. It was a bright, dry 77-degree day, typical for east of the San Francisco Bay Area in the fall. It would have been even brighter if it weren’t for the thin layer of dust covering everything, dimming the reflection from the sun. In testament to how dry it was, historically bad wildfires would break out later that evening farther north in Sonoma County and burn many acres of farmland, vineyards and homes over the following days.


