


If you find this article useful, why not start a subscription to Growing for Market? GFM keeps you informed about all the innovations that help small vegetable and flower farmers be successful. Click here for more information about subscription options that will give you access to more than 1,100 useful articles about growing and selling local food.
It’s easy. Here are three ways, condensed and adapted from experts sources, including two growers. Each way works well. Why not try them all? See which one is right for you. Just give yourself an extra two weeks to start seedlings for grafting, so allow seven to nine weeks before transplanting for production.
Materials needed
•X-acto knife or single-edged razor blade.
•Latex gloves (optional).
•Chlorine bleach solution (1:9) for sanitizing tools and work surfaces. Disinfect cutting tool in chlorine after each completed graft. Rinse with plain water.
• Labeling materials, waterproof marker.
•Scion seedlings. This is the fruiting top. It can be any variety you want, from an heirloom to a greenhouse/poly-tunnel type.
•Rootstock seedlings. (Maxifort available from Johnny’s is used by growers interviewed.)
•Grafting clips (silicone or spring-loaded, also from Johnny’s) or non-porous surgical tape.
•“Healing” chamber — It doesn’t have to be anything fancy. Any simple framework will do, just so it stays dark and holds high humidity. Missouri grower Brandon Fahrmeier drapes black plastic over a five-shelf galvanized flower shipping rack to block out light. He mists, as needed, with a fog nozzle on a garden hose.
The Basics
They’re the same, however you wield the scalpel.
1. Soon after the first set of true leaves is fully developed, transplant seedlings into 2.5- to 3-inch individual plastic pots. Carefully label each variety so that rootstock and scions don’t get mixed up.
2. When plants are five to six inches tall and have four or five well-developed leaves, select scion and rootstock stems of similar size. Water seedlings well at least one hour before grafting. Early morning or just after dark are best times to minimize stress on seedlings.
3. Graft, using one of the methods described below.
4. Place grafted plant in healing chamber for 10 to 15 days. A small amount of wilting is normal the first day. Block all light for two to four days. Open the chamber at least twice a day to replenish carbon dioxide. Fahrmeier gradually “weans” his grafted seedlings to light by first uncovering the north side first, then the east side and so on. When plants are almost completely healed, he takes off the south side, exposing them to full sun.
5. Remove and continue to remove all lateral shoots below the graft. Remove any adventitious roots that may sprout above the graft. As the plant lengthens and the stem is lowered to make room in the greenhouse for new growth, keep the stem off of soil or other possibly contaminated surfaces.
“Scalpel, please.” Or, Making The Cut
Method A – Top or Tube Graft
1. Above the cotyledon (first pair of leaves), sever the bottom half of a rootstock seedling from its top with a 45-degree angle cut.
2. Slide tube-like silicone grafting clip halfway over top of cut rootstock end.
3. Also above the cotyledon, cut the top off of a scion seedling at a matching 45-degree angle at a point where the stalks are the same diameter.
4. Insert cut end of scion into grafting tube/clip. Gently push the two stalks completely together to join tissue and remove air pockets.
5. Secure the grafted seedling to a small stake and place it in the healing chamber.
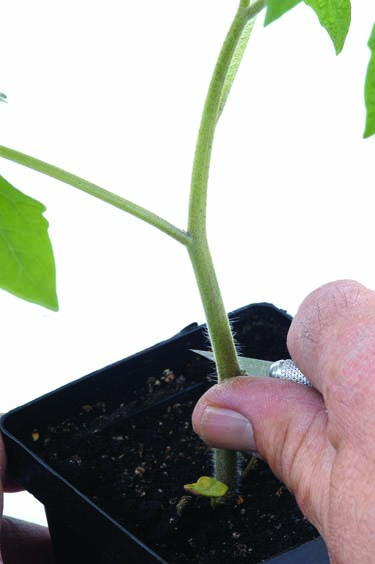
Method B, shown
.jpg)
.jpg)
.jpg)
Above: Cut the rootstock seedling flat, then carefully split the stem vertically. Cut the scion seedling at a sharp angle, and insert it into the slit you made in the rootstock stem. Push the two together, getting as much contact between them as possible, then hold the graft in place with a grafting clip. Photos courtesy of Johnny’s Selected Seeds.
Method C – Side or Cleft Grafting (shown below)
1. Seed scion and rootstock and scion side-by-side into the same container. Label each plant to avoid confusion.
2. Cut the top off of rootstock seedling about four inches above the soil surface, leaving a pointed end like an upside down “V.” Discard the top.
3. Slightly lower on the scion seedling, cut a similar “V’ notch or “cleft” about halfway through the stem.
4. Bend pointed rootstock tip and insert into the opening on the scion plant. “When you make a nice graft and insert, the plants almost spring together,” says Vermont grower Jack Manix. “The side graft is much more forgiving.”
Align the edges. Gently press to eliminate air spaces. Clip or tape the union. Place the container in “healing chamber” and handle as described above.
5. When the graft looks to be successful (after about one week), cut the stem of the scion plant below the graft. Remove rooted portion of scion plant. Support the grafted plant with a small stake and twist tie.

To subscribe to Growing for Market online, click here.
Copyright Growing For Market Magazine.
All rights reserved. No portion of this article may be copied
in any manner for use other than by the subscriber without
permission from the publisher.