In the March 2016 issue of Growing for Market I wrote about hoophouse siting and planning, USDA grants and shopping for a suitable structure. I discussed the two basic shapes (Quonset and gothic), as well as single versus double layer plastic. Here I will discuss the next stages of design.
Structure styles
Decide between Quonset and gothic shapes, and the bow spacing to suit your needs. Know what likely snow loads and wind forces your tunnel will be called on to deal with. Look at what is available, and especially if you are in a heavy snow area, or if you intend to hang heavy plants from the structure, get one that is strongly built. Look at the gauge (steel thickness) – most commercial houses are 13 or 14 gauge galvanized steel for strength. The smaller the gauge number, the thicker the steel. The thickness increases by 10% for each lower gauge number. The tubing has a diameter of 1.7-2.4” for the bows (bigger tubing for the bigger models), 1.3” for the purlins.
For windy areas, look for diagonal bracing at the end walls (“corner braces”), and trusses running across the width at each bow. Well-made tunnels can last 20 years and more. Lighter weight tunnels have lengthwise purlins but no crosswise trusses. If you want to run overhead support wires, hoses or sprinkler systems, take a close look at the strength of the trusses and purlins, and designs that make these additions easier.
Sidewall design
Opening sidewalls are a way of increasing the ventilation without using fans. The air passing over the hoophouse creates enough of a pressure difference to pull air though opened sides. Therefore, if opening, it is best to have both sidewalls open. See the ventilation section on the Hightunnels.org website. Air leaks are a problem on windy days (and nights!). Add an extra section of plastic between the end two bows at each corner to ensure a good seal when the side is closed.
Roll up sides open first at ground level. Drop down sides have the advantage that they can be partially opened to leave a short sidewall protecting young plants, and deterring small animals from entering. The bottom edge of the sides is firmly fastened to the baseboard, eliminating ground level drafts. The top edge is fastened to a length of tubing. A system of cables and pulleys raise or lower the walls either manually or via a motorized winch.
Heavier duty plastic may be used for the side walls, although this will make the system heavier and harder to operate. Manual cranks are easier to use if a universal joint is included. They are easier still with the addition of a gearbox with a gearbox ratio of 10:1 or 15:1. A battery-powered drill can be used for a simple method of mechanization. Top-of-the-line motorized gearboxes can be controlled by timers and thermostats. Limit switches are needed to tell the motor when to stop.
Some double-layer models have ridge vents. This does add considerably to the cost, although a ridge vent combined with roll-up sides provides very good passive ventilation for high tunnels.
Below is a photo of one of the author's hoophouses. It is gothic-style with roll-up sidewalls. Photo by Kathleen Slattery.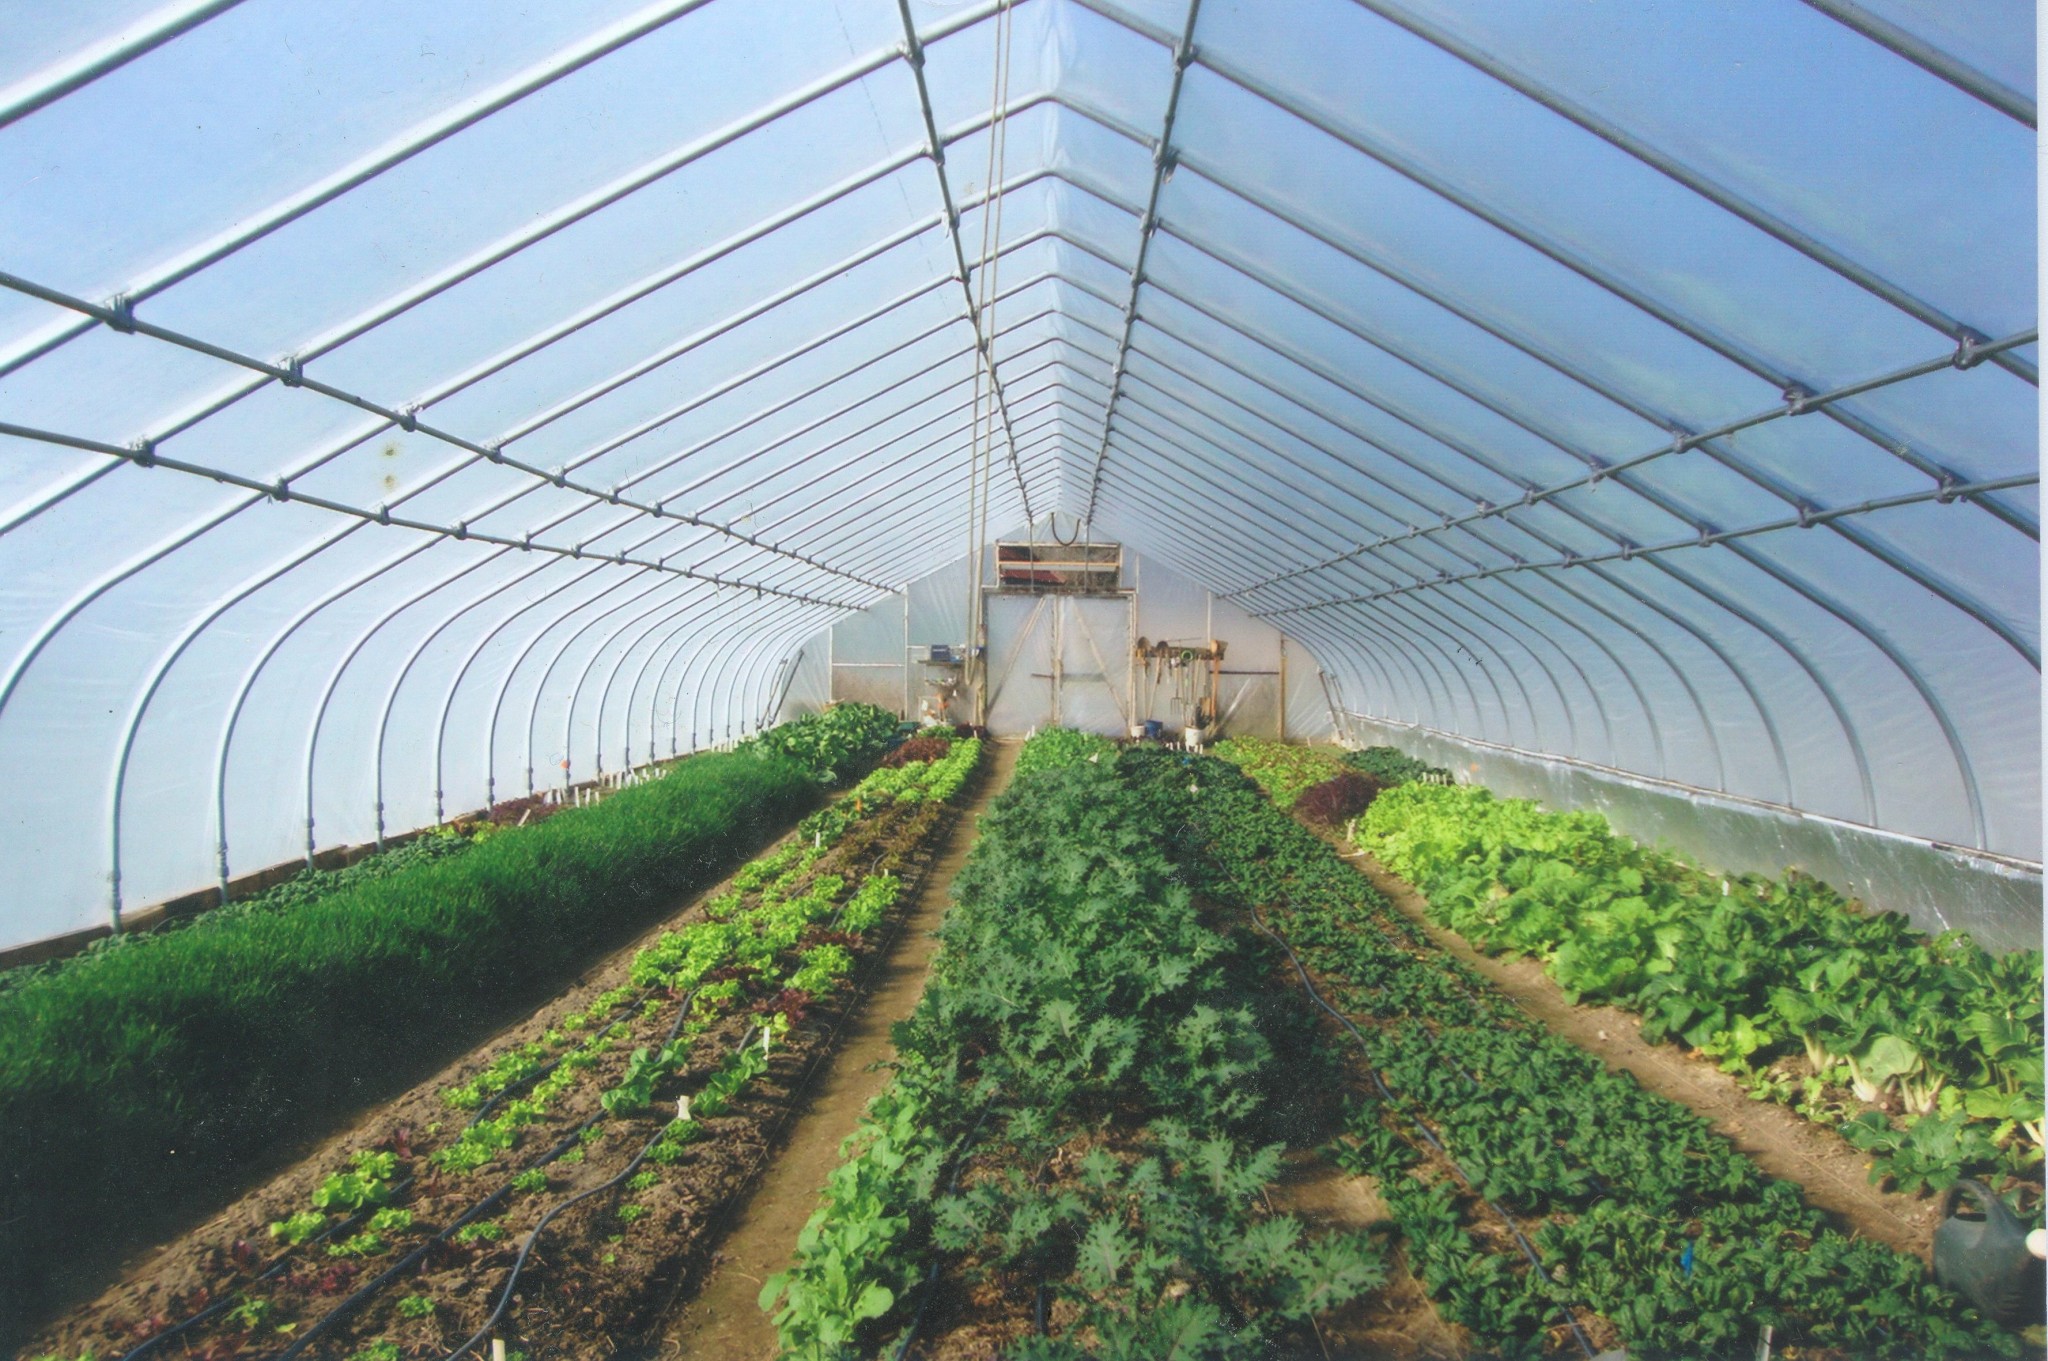
Roads and utilities
Plan for the traffic you expect and for your possible future needs. Growers using only hand tools and garden carts can get by with mowed pathways, but those using trucks will need to build near a road or make a road nearby.
You will need a reliable source of piped water and if you are already hooked up to the electric grid, go ahead and map out how these utilities will get to your site. Call the people who scan for existing lines below ground before you dig, and look up any records you have of previous utility work in that area. Renting a ditch witch saves a lot of hard manual labor, and will do a better job than hand digging. It’s hard to get a trench deep enough while keeping it narrow. You will need to put water lines below the frost level for your climate region. Install a frost-proof hydrant at one end of your tunnel, to one side of the main doors. That is, in a convenient place that will not be an inconvenience for some other task, like bringing in bulky loads of compost.

Drip irrigation
Unless you have a very small hoophouse, I recommend drip irrigation. You could choose to hand-water with a wand and hose in the winter to help combat salt build-up in your soil, but it would be a big waste of time to hand-water in warm weather, when lots of water is needed. If you don’t currently use drip irrigation anywhere else on your farm, this is a good place to start. Think about an efficient layout - it pays to have longitudinal beds. We have a Y-valve on our hydrant, with one side always available for hoses and cans. The other side has a mechanical timer, a pressure reducer, a filter and then mainline tubing. As drip systems go, this one will be small, so ¾” mainline tubing is plenty big enough. Our mainline tubing tees to go in both directions to the sides of the hoophouse, and lengths of drip tape are plugged into the mainline at a rate of three per 4’ bed and two per 2’ edge bed.
Although we do not pin down our drip tape outdoors, we do pin it down in our hoophouse, using 6” sod staples (also used for holding down row cover or landscape fabric). They sell at around $40 for a box of 1000. Because it gets hot indoors, the empty drip tape stretches and meanders if not held in place and you could end up watering the paths and not your tomatoes.
In-ground insulation?
In Pennsylvania Steve Moore recommends in-ground perimeter insulation in the form of 1” styrofoam blueboard 2’ wide in the ground angled at 45 degrees, like a skirt all around the perimeter. The blueboard is then covered by soil. We did this with ours in central Virginia, (using 16 4’x8’ sheets, at a cost of a few hundred dollars), but if I were constructing another, I would not use the in-ground insulation. It was a lot of extra work, excavating and backfilling, and I don’t think it paid off in our climate. In colder climates, obviously the balance shifts. Steve also used interior pathway insulation. He collected data with microclimate monitoring equipment, and proved the insulation to be worthwhile in southeast Pennsylvania.
Endwall design
Endwalls can be framed with metal tubing or with wood, or you can simply use a big plastic curtain that rolls up, or a pair of curtains attached to long battens which can draw the doors open and be fastened at the sides. This minimalist approach suits mild climate areas, where the tunnel will be cultivated by tractor and the crops are not extended too far from their outdoor season. Curtain walls do not add any strength to the structure, and do not provide a framework for attaching tool racks, pedestrian doors or graduated ventilation.
If you cultivate by hand, you don’t need the complete end to open, and you’ll probably want a relatively small door to come and go by in cold weather. As well as doors to open in warm weather, you can have high windows to vent the rising hot air out of the tunnel. Anyone with basic carpentry skills can make these door and window frames, as they will be covered in lightweight plastic and not be heavy or need to be extremely strong.
There is a whole page of door designs at the Hightunnels.org website and other helpful pictures in the “High Tunnel Construction” presentation by M. D. Orzolek on the psu.edu plasticulture site. For our 30ft wide gothic hoophouse, we have a pair of hinged double 4’ x 8’ doors at each end with a horizontal 6’ x 2’ window above it. Our doors open out and have to drag over the grass as it grows outside. We have found “rising butt” hinges to be helpful here. As the door opens, it rises on the curved base of the hinge, giving a little extra clearance above the ground. Each door fastens with a hook and eye to the wall when open (it will get windy!). I’d recommend looking into sliding doors, with the track and hardware on the inside, if the tunnel is wide enough for the track needed to carry the doors. This avoids problems in many types of weather: rampant grass-growing season, snow season, strong winds.
Our windows are a “butterfly” design, held to the wall at the center of each side of the frame by a bolt through the wall framing and the frame of the window itself and a pair of nuts locked against each other. These balanced lightweight windows are easy to open. Ours have a retractable catch at the top and a loop of cord to retract the latch from ground level. We also have a retainer cord which loops onto a hook in the wall, to keep the window as open or closed as we want it. Battens prevent the window from opening completely flat (you don’t want to let rain build up on a horizontal window).
Inflation blowers
Provided you have no big leaks and that you have not put the plastic on too tight, a 60 cubic feet per minute (cfm) blower is adequate for a 30’ x 96’ house. The next size up is usually 148cfm.
Along with the blower you can buy a baffle to fit on the outflow tubing side of your blower, which carries the inflating air through the inner poly. The baffle is intended to stop excess wear at the spot the outgoing air hits the outer poly. But this isn’t a jet engine, and the force isn’t great. We’ve never used one and haven’t had a problem. Our tubing fastens to the poly with a twist together pair of plastic rings. You do need the tubing and the rings. You also need a metal bracket to support the blower, fastening it to the framework at one end wall. You may also buy a wide tube to bring the outside air through the end wall into the blower. Ours came without, and we used tumble-dryer tubing and duct tape.
It is important to bring in outside air into the blower, rather than use moist warm indoor air, as this could condense once it got between the layers of plastic. To make effective use of the blower, you will need a manometer (pressure gauge). This simple device can be made when the time comes. By watching the relative levels of water on the two sides of the manometer tube you can measure the pressure difference between the inflated space between the layers of plastic and the open air. Adjust the inflation blower air intake flap as needed. Many growers operate without manometers, but there is a risk of overinflating the plastic without monitoring the pressure.
Fans
Distinguish between inflation blowers and fans for moving air within the hoophouse. We do not use air-circulating fans, but some growers strongly recommend them. A cheap box fan every 10’ will keep air moving through the structure. Try them and see if you notice a difference. Some swear by specialist ceiling fans attached to the roof trusses – they notice better pollination, fewer foliage diseases and sturdier plants. Additionally, they report that roof fans help slough off snow, presumably by circulating the warmest air up to the top of the house.
How will you cultivate?
Tractor? Walk-behind tiller? Manual tools only? This decision will influence the size of doors you need in the end walls, and the bed layout. It is easily possible to rid the hoophouse of weed seeds in just a season or two, and after that keep it free of weeds by timely hand-weeding. “Let no weed seed” is one of our mantras.
After ten years, we started to be concerned that the soil was compacting, especially along the edges of the beds where our feet would sometimes stray. We solved this by buying a broadfork and by delineating the edges of the beds with thin nylon cord pinned into the ground with 6” drip tape staples. We level the paths using a floor ice scraper (a steel blade on a 60” handle, about $30-40 from hardware suppliers). We found that a smooth level path really does feel wider, and makes it easier to avoid stepping in the beds. Our broadfork is an all-steel model from Way Cool Tools, which we are very happy with. We use it once a year when clearing summer crops from the beds and preparing for fall and winter crops.
By now you should have enough information to plan your hoophouse and order parts. The winter is a great time for planning, but make sure to order with plenty of time for them to arrive by the time you need to get building. Some suppliers require more lead time than others. Remember that a lot of other growers are probably ordering structures this winter, and suppliers will be busy trying to keep up as the weather turns warmer.
Pam Dawling manages 3.5 acres of vegetable gardens at Twin Oaks Community in central Virginia. Her book, Sustainable Market Farming: Intensive Vegetable Production on a Few Acres, is widely available, including by mail order from Sustainable Market Farming, 138 Twin Oaks Road, Louisa, Virginia 23093. Enclose a check (payable to Twin Oaks) for $40.45 including shipping. Pam’s blog is on her website at www.sustainablemarketfarming.com, and on facebook.com/SustainableMarketFarming. Pam also makes presentations on vegetable growing topics at conferences and fairs from September to May each year.


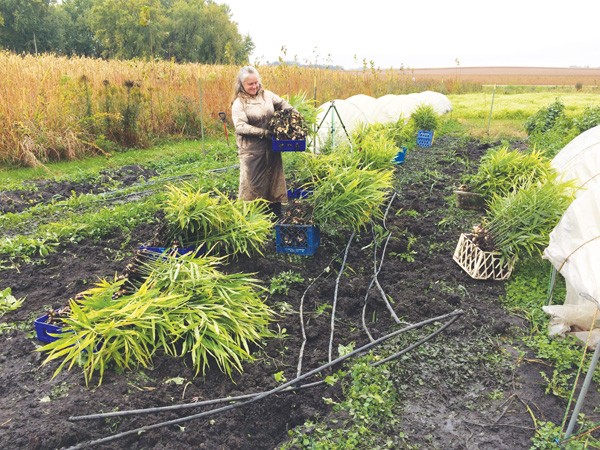
 Why two of our hoophouses are named because of Emily
 As soon as we start driving our routes in the spring our customers ask us when we’ll have roselilies. They’re that popular and have become a signature crop for us. They’re basically a type of oriental lily, but with multiple layers of petals, and without stamens and pistils (i.e. no pollen!).

 In the hoophouse plants grow bigger and faster. We want to avoid anything that slows growth down. All that growing burns up the organic matter and nutrients in the soil at a fast rate, particularly in hot, humid climates. We need to replenish the soil more generously and more often than we do outdoors. Good soil health means having enough plant nutrients, not surplus. If you have too much soluble nitrogen (N), it can leach into the groundwater or burn up the organic matter. Using manure or compost for a nitrogen source can cause the build-up of excess phosphorus (P).
 We have three main seasons in our zone 7 central Virginia hoophouse: fall-winter (October to March), spring-early summer (March to July) and high summer (August and September). We grow one bed (90’/27.5 m or so) each of yellow squash and bush cucumbers in the spring-summer season, for reliable early harvests and to help with crop rotation. If you farm in a colder climate than ours, you might be questioning allocating the precious real estate to a crop that so quickly goes from desirable to over-abundant, especially when there are more profitable things to give the space to. One reason is a difference between southern and northern climates.
 Local and organic ginger is a high-value crop that in the right market can be in high demand. Growing this tropical crop in the Midwest can be a challenge, and thus far, farmers thought they had to own a high tunnel to ensure adequate heat during the variable spring and fall seasons. High tunnel space on most farms is at a premium, so it is expensive space to devote to a long-season crop.
 With protected space on the farm at a premium, we have to choose wisely when deciding which crops are worth putting under cover. We start out by deciding what to grow overall, and then deciding how much of that can fit inside structures, by doing a little revenue and profit analysis. Quickbooks is used to record sales, so it’s easy to list sales per item at the end of the year to see what brought in the most revenue. A version of that report extracted to a spreadsheet calculates profit per square foot by first subtracting the costs of plugs or bulbs, and then dividing by the cultivated area for each item.
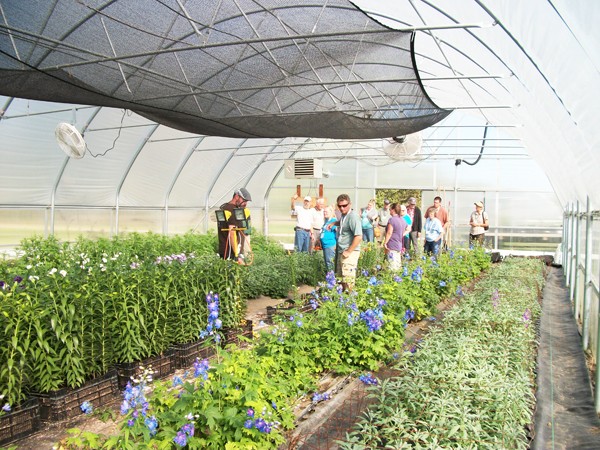 Prairie Garden Farm has been growing cut flowers for florists and studio designers since 2010. As we’re on an exposed hillside in west-central Minnesota, we’re dependent on protected culture to grow quality flowers. This article describes our approach – planning, financial, and operational details - that helps us make the most of our structures.
 When we talk about high salt levels in soils we do not mean simply sodium chloride, as we would if we complained of too much salt in our soup. “Salts” in the agricultural sense means all soluble ions or nutrients - nitrate, ammonium, potassium, calcium, magnesium, chloride and sulfate. Remember that these are essential nutrients – they are our friends. As with much in agriculture, soluble salt concentration is a matter of balance.

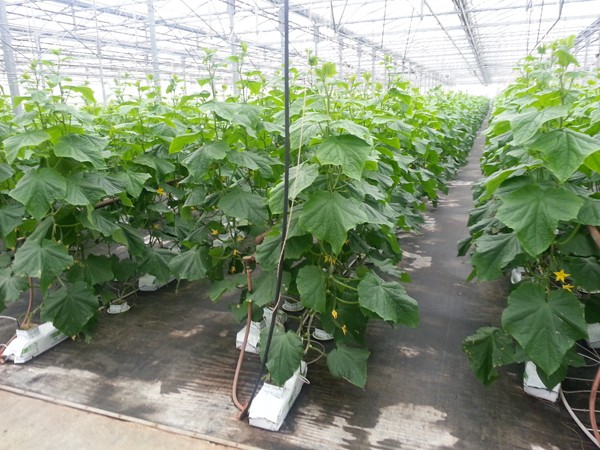 I’ve often wondered why more market growers don’t use umbrella pruning for greenhouse and hoophouse cucumbers. It’s probably the most common way of growing cukes in greenhouses, and translates well to hoophouses and smaller structures with trellising in the 6-7’ range. I’m pretty sure the reason it’s not used more is unfamiliarity, since most smaller growers I’ve talked with don’t know about it. It’s called umbrella style because the main stem is grown up a string (the umbrella handle), topped at the wire, and two suckers are allowed to grow out to each side (the umbrella canopy).


