Vegetable seeds require only two conditions in order to germinate--the right temperature and the right amount of moisture. In fact, you can germinate a seed in thin air if the air is warm enough and humid enough. The soil is merely a landing pad for the first root (also called the embryonic root, or “radicle”) to grab hold of.
Problem is, starting a seed in potting soil in a greenhouse requires constant vigilance by the grower to maintain perfect temperature and moisture. A lot can go wrong. The sun can come out and dry up your trays. UV energy can collect surprisingly fast and cause small spaces to overheat. Soil temperatures are often too cold or too hot for seeds to “pop.”
Heating mats help, but elements wear out every few years. And trays are still subject to the drying effects of air and the unpredictable sun.
This is why large-scale operators use germination chambers to achieve year-round consistent germination results. These climate-controlled chambers put just the right amount of heat and humidity into the air to coax seeds to life. They are available through nursery catalogs and are a common piece of equipment found in university biology labs.
Unfortunately they’re also very expensive, starting out in the thousands of dollars.
One of the task of small farms is to adapt methods used by larger growers to a scaled-down operation. To this end, we spent a portion of last winter designing and building a small-scale, farm-built germination chamber that gives us the same results the pros can get from theirs. (Thanks to the folks at Northern Harvest Farm in Wrenshall, Minnesota, for some design consultation.)
The concept is simple, and anyone with basic wiring skills can build one for a fraction of the cost.
A sauna for seeds
Essentially, a germination chamber is an insulated box that is heated by a small pan of hot water. When air temperature cools below a set point, the water heats up, releasing both heat and humidity. The environment is like the inside of a small sauna after water has been poured on hot rocks, releasing steam into the air.
The air is so humid, in fact, that seeds do not need to be covered. Because the chamber is small and insulated, the temperature stays very even--insulation keeps the box toasty enough to germinate peppers in February, and in July it blocks intense summer sun from drying out and overheating fall brassicas.

Within a few hours or a few days of going in, seeds have germinated and trays are removed from the chamber.
The biggest challenge with a germination chamber is remembering to take your seeds out before they turn into noodles. We’ve found that most seeds have a window of about 12 hours in which you can remove them. Since we are checking in on our greenhouse every day, this has not yet been a problem.
We keep a chart on the door of our chamber on which we track germination time for different seeds. If I’m nervous about forgetting a valuable crop (for example, my heirloom tomatoes), I set an alert for my phone.
We always keep the temperature set at 78 degrees.
DIY germ chamber
Here is what you’ll need to build your own germination chamber:
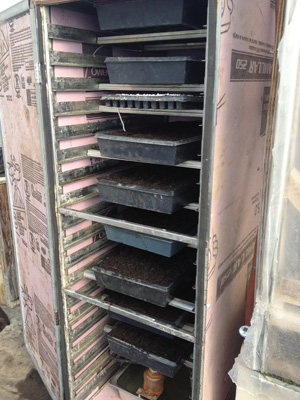
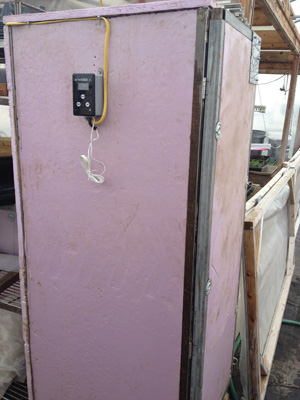
1. An insulated upright box with a full-front door (good use for an old upright freezer or a chest freezer set on end; we used a 24 x 20 bakery rack that we covered with 1” rigid insulation).
2. A stainless or galvanized pan that fits in the bottom of your box and holds 4-6” of water.
3. A hot water heater element (available for less than $15 from any hardware store, 15 Amp is sufficient).
4. Enough 15 Amp wire to reach your box.
5. A thermostat with external sensor (we bought a digital DuroStat sensor from FarmTek/Grower’s Supply for $90).
6. A stock tank float valve (available from your farm supply for around $10).
Our chamber (not including the box) cost us less than $200 to build.
The maximum number of trays you anticipate seeding at one time will determine the size of your box. Make sure to calculate 3-4” of space around your trays for air movement. For our shelving system, we cut lengths of aluminum u-channel (two under each tray).

If you don’t have a stainless or galvanized pan, your local welder can make you one. While they are fabricating your pan, have them weld in a fitting for your hot water heater element about an inch from the bottom.
We had a 12 x 24 x 5” pan on hand and used galvanized pipe to suspend our hot water heater element in the pan. Our chamber holds 20 trays. Northern Harvest Farm uses a pan that is 36”x15”x5” in a chamber that holds 90 trays.
Place the pan on the bottom of the box, in the center. Make sure your floor has a few small holes for excess water to escape.
Then attach the float valve (with water source) to the pan. This will ensure that your pan doesn’t dry out and burn out your element.
Next mount your thermostat to the outside of your box and wire it to a switch box and to your heater element following instructions from your thermostat’s manufacturer.
That’s it! For us, the project took about a day once we had all the parts. We have been using it all year for crops including onions, peppers, tomatoes, microgreens and pea shoots, and have been very satisfied.
Ben Hartman and Rachel Hershberger own Clay Bottom Farm near Goshen, Indiana. They have a CSA and sell at the Goshen Farmers Market. They can be emailed at [email protected].

 Since its founding in 1968 by my husband Eliot Coleman, Four Season Farm has sought to produce the best vegetables possible, using soil-based organic methods, on a small amount of land. When I showed up in 1991, Eliot had begun to pioneer winter vegetable production, and I was delighted to give up the landscape design business I’d run in Connecticut and grow veggies with him. Then, about 10 years ago, flowers started to creep in.
 Like many farms, we have taken the paper pot plunge.


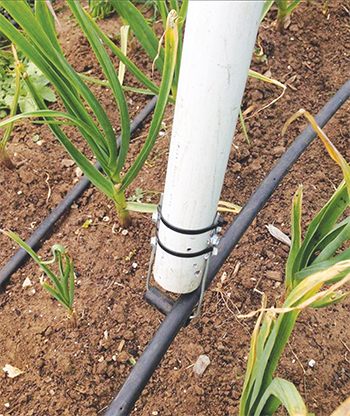 When I saw this tool I knew the exact need that inspired its creation and I loved seeing the abundant comments from other farmers around the world who had also created their own versions, born of that same common need. Nat Wiseman from Village Greens of Willunga Creek near Adelaide in southern Australia posted a very simple and relatively quick fix to the problem of laying drip lines in garlic after the canopy has already filled in.

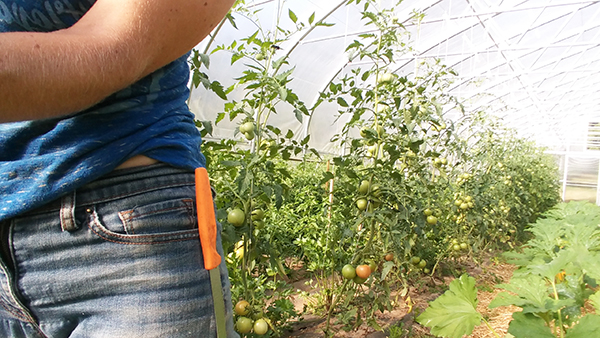 Another simple and relatively inexpensive tool drew me in on social media this month – a magnet in the place of a knife sheath submitted by Kat Johnson, the Produce Manager at Fields Edge Farm in Floyd, Virginia.
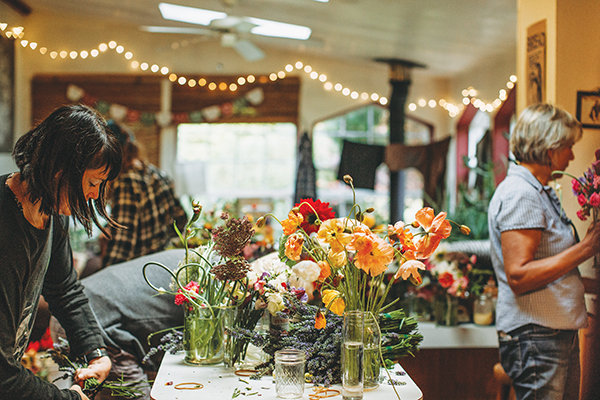 Weddings are a huge opportunity for local flower farmers, especially with the growing awareness of and demand for seasonal, sustainable flowers. And, if there is one time that people really want special flowers, it’s at their weddings.
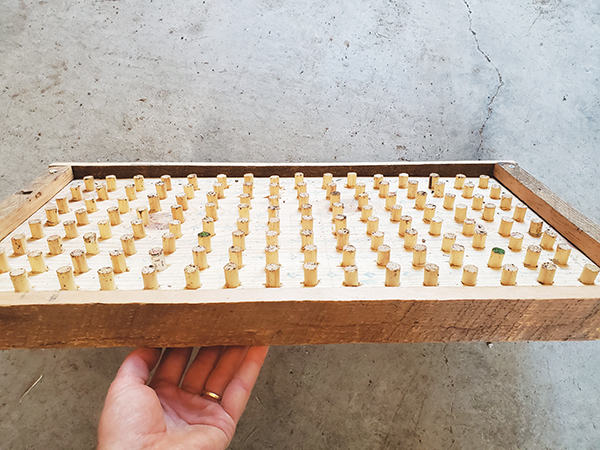 Megan French from Boundless Farmstead near Bend, Oregon, posted these dibblers she built on Instagram and reminded me that I need to get my act together. On their farm they’re typically seeding 30 to 100 trays per week with a vacuum seeder. To get evenly dibbled holes before making the dibbler boards they were using a single bolt with a nut and washer to set the depth. One. Cell. At. A. Time. Which understandably was slow.
 Until two years ago I was germinating all seedlings in greenhouses using almost exclusively bottom heat from electric heat mats. At my current farm we only had space for about 8-10 trays on our two mats and we definitely noticed differences in the germination (and presumably the heat the mats were providing) on the edges of our trays.


