Carrots
Carrots can provide high yields for the time invested and space occupied. They thrive in mild weather, store well, and are popular traditional foods. They can be useful as insurance crops for lean times — offer more of them when other crops are scarce. Carrots do, however, stay in the ground longer than some crops. I usually reckon on 60 to 100 days from sowing to harvest, a bit faster in warm weather.
In central Virginia, we can sow carrots from February to August, although June and July don’t produce the tastiest crops. Sow from early spring, up to 30 days before the last frost date for late spring or summer harvests, and in late July or August for a fall harvest.
Bed prep and spacing
Researched crop spacing for maximum yields or biggest vegetables is in The Complete Know and Grow Vegetables by JKA Bleasdale, PJ Salter, et al. For maximum total yield of carrots (medium-sized), use 1.5” x 6” (4 x 15 cm). For early carrots use 4” x 6” (10 x 15 cm) to minimize competition and get rapid growth. If you want a different spacing, take the area per carrot of these optimum spacings (9-24 in2/60-150 cm2) and divide by your chosen row space.
Old books warn against spreading manure before planting carrots as it will make them fork. This refers to uncomposted manure, not to compost. Compost will increase yields, and may even reduce the culls. Compost increases the organic matter in the soil and suppresses some diseases and nematodes (which can cause forked carrots), according to an article by Daniel Brainard, et. al., “Effects of plant and animal waste-based compost amendments on the soil food web soil properties and yield and quality of fresh market and processing carrot cultivars.”
Carrots will grow in any decent soil, but the best ones grow in deep, loose, fertile sandy loams with good moisture-holding capacity. Kill weeds with the stale seedbed technique: prepare the bed as if you were about to sow, producing an even surface with a fine tilth (surface texture). Then water as if you had sown something, watering the surface whenever it dries out. As soon as you see tiny weeds germinating, hoe the surface very shallowly in sunny, breezy weather and let the weeds die. Make a last hoeing the day before sowing the carrots. Try to start early carrots in a bed that had only light weeds the year before.
Another method of germinating and killing weed seedlings when there is no crop in the ground is tarping: cover the watered bed with an opaque waterproof cover. Weeds germinate, but cannot grow without light and will die. I recommend The No-Till Organic Vegetable Farm, by Daniel Mays for good instructions.
Solarizing is another approach that works well in hot weather: cover the prepared bed tightly with clear agricultural plastic, such as scraps of a hoophouse covering. The heat of the sun bakes any weed seeds near the surface, and also any disease spores or small pests. Larger creatures such as earthworms can burrow deeper into the soil (as they do anyway in hot weather).
For killing weeds after sowing the carrots but before they emerge, see the section on flame-weeding.
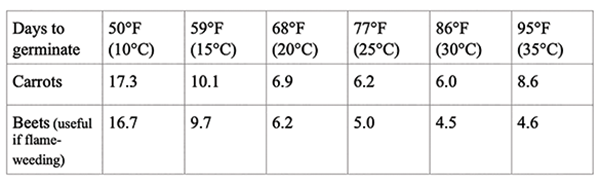 Number of days to carrot and beet germination at various soil temperatures.
Sowing
Sow carrots whenever the soil is below 95°F (35°C), and keep the surface damp until the seedlings emerge: maybe only four days in summer. Aim to sow 30 seeds/ft (1/cm), 0.25-0.5” (0.6-1.2 cm) deep. Some people sow in single rows 6”-10” (15-25 cm) apart. Others sow in bands 2” (5 cm) wide, 8” (20 cm) apart, with one length of drip tape serving two bands. Carrot seeds average 18,000 seeds/oz, 625 seeds/gm. And, 3,000 seeds (3/8oz, 10 gm) will sow 100ft (30 m), at 1 seed/cm.
Hard rain in the first few days after planting can cause a crust which could reduce emergence. To prevent this, if you get heavy rain, irrigate for half an hour each day afterwards until the carrots emerge. You could use shade cloth to help keep the soil moist.
Precision seeders save you from thinning, but many growers use an EarthWay seeder and thin. Some people mix inert materials with the seed to help get a spaced row. Sand at 1 quart (1 liter) to 0.5 teaspoon (2.5 ml) seed per 25’ (8 m) of row, is one recipe, although I worry that sand will destroy the plastic parts of the EarthWay seeder. Some people bake old carrot seed to dilute the good new seed, reduce the thinning work and the wasted seeds.
Thinning and weeding
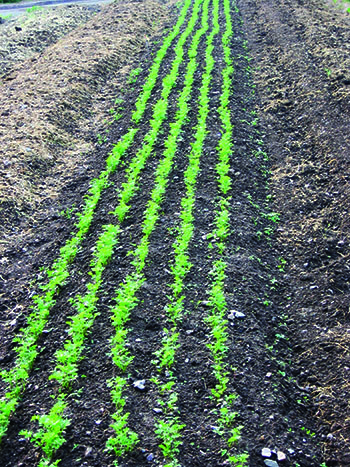
Thin carrots as soon as you can see them or there will be too much competition for water and nutrients from the weeds and surplus carrots. We usually have someone with good vision and hand-eye coordination hoe between the rows the day before hand-weeding and thinning to about 1” (2.5 cm) apart.
If you are troubled by Carrot Rust Fly (Carrot Root Fly), remove all thinnings and broken foliage from the field, so you don’t lure the low-flying pest with the wonderful smell of the broken leaves. We do a second thinning to 3” (8 cm) once the baby carrots can be used for salads. It’s rare that we need to do another round of weeding before harvesting full-size carrots.
To get good carrots without thinning, you need either a precision-seeder that drops one seed per inch, or pelleted seed hand-sown at one per inch. Precision seeders like the Jang are expensive, but worthwhile if you will use it every week. Pelleted seed costs more than raw seed, and its big advantage is traded off for two disadvantages: the seeding has to be kept well-watered until germination or else the clay coating will imprison the seed forever, and the seed is short-lived. Don’t keep any over for next year.
For weed control in carrots and other direct seeded crops, there is some research into strip tillage in a living cover crop, but this results in substantial yield reduction due to resource competition. See the e-Organic article “Hydromulching in Carrot: An Organic Weed Control Tool for Direct Seeded Crops.” Hydromulch (a slurry of shredded newsprint in water) was sprayed directly after seeding carrots by placing a C-channel steel bar directly over each seeded row to create a slit within the hydromulch for the carrots. The C-channel was lifted and moved along the row to the next spot [eorganic.org/node/34194].
Flame weeding
Carrots (and beets) are ideal crops for pre-emergence flame-weeding. The goal is to flame the bed the day before the crop emerges. Use the table above and a soil thermometer to figure out when to flame. For carrots, sow a few “indicator beets” at one end of the bed, and as soon as you see the red loops of the emerging beet seedlings, flame the carrots. But, look for carrots, too, just in case. The table shows that beets are always a bit quicker than carrots in germinating.
Flame-weeding is a great way to get rid of millions of fast-growing weeds and leave the field free for the slow-growing carrots. It is much easier to see the seedlings, and they grow better if the first flush of weeds has been flamed off. In summer, we flame carrots on day four after sowing because we have found that carrots can emerge on day five in summer temperatures, despite longer times given in the charts.
Flamers use propane, a fossil fuel. You will need to decide if this is a justifiable use for your farm. The task of flame weeding is quick and easy, and saves so much hand weeding. We use a Red Dragon hand-held flamer attached to a propane cylinder that is in a wheelbarrow pushed by a second person behind the first. This person also acts as a safety monitor, looking out for unwanted things (like hay mulch burning). Some growers mount the propane on a backpack frame, and work solo, but we prefer to include a second person.
The operator walks along the aisle between beds and wafts the wand diagonally back and forth across the bed. It takes about 10 minutes for a 100’ (30 m) bed. Flame weeding can reduce hand-weeding to one hour/100’ (30 m). Flame weeding plus stale bedding three or four times can reduce hand weeding to six minutes/100’ (30 m).
Rotations
To reduce diseases and maximize nutrients, practice three-year crop rotation. Carrots are umbelliferae, along with celery, celeriac, parsnips. Our fall carrots follow our garlic, often with a quick cover crop of buckwheat in between. In this way we get two produce crops in one calendar year. Our early carrots need beds with winter-killed cover crops (such as oats), or empty (but not weedy) beds. Early summer carrots often follow overwintered leeks. Late summer carrots often follow June-harvested onions.
Succession planting
We start with carrots in February and sow every couple of weeks through April. Our soils are not 50°F (10°C) in February (sometimes recommended as the lowest soil temperature to sow), but the seed comes to no harm in the ground, and it’s a job we can get done early. We sow our sixth bed of carrots in mid-May, our last month for sowing carrots that we know will be sweet. Our plan is to have grown enough between February and May to last until late October and have bags in storage in the walk-in cooler.
If we need to, we also sow once a month in June and July, but the hot weather impairs the flavor, and may even make them bitter. Unlike some other crops (lettuce and spinach come to mind), carrot seed will germinate just fine at high temperatures. The challenge is to keep the soil damp. Shade cloth can help, or you can just water a lot.
Early August (10 to 12 weeks before our usual first frost) is when we establish crops to store through the winter. Although hot weather is not easy for root crops, the calendar boxes us in. These carrots will taste good, because the weather cools as they grow.
In the fall, we can leave Danvers carrots in the ground until temperatures drop to 12°F (-11°C). Because our winter temperatures drop below this temperature, we do not usually try to overwinter carrots in the ground. Also we have voles who like carrots as much as we do. But this past winter we had some Danvers 126 carrots outdoors over the winter. We didn’t get the seed in the ground until September 5, too late for large carrots before winter. We harvested them in March and got 150 pounds from 400 row feet. Not a high yield, but they tasted good. Normal yield is 100 lbs (45 k)/100ft (30 m), 30,000 lbs/acre, 5443 k/ha.
Pests, diseases and disorders
Carrots have several insect pests. The main two are the Carrot Rust Fly and the Carrot Weevil, both tunnel in the roots. We have had one root-tunneling pest, probably the weevil. Carrot Rust Fly has not been seen in Virginia for 20 years, so we may be able to relax our practice of removing all the thinnings from the field. The Rust Fly usually tunnels in the lower third of the root, and the weevil (with wider, more open tunnels) works on the shoulders. If necessary, use fine mesh ProtekNet, battened down around the edges to keep flying pests out. Use hoops to hold the netting up above the foliage, keeping it inaccessible to insects.
If we are unable to get our fall carrot sowing finished in early August, we wait and sow in late August to avoid hordes of emerging baby grasshoppers. Good resources include Garden Insects of North America by Whitney Cranshaw and the Ontario Ministry of Agriculture, Food and Rural Affairs fact sheet on carrot insects: https://tinyurl.com/tvzdf9mf. Washington State University conducted research using pathogenic nematodes and other possible parasitoids and predators of rust fly: http://agsyst.wsu.edu/CRFreport03.pdf.
Carrots can be afflicted by Alternaria and Cercospora fungi, which reduce yield and quality. Alternaria blight starts on the oldest leaves, which blacken and shrivel. We get this in the summer, and our response is to harvest right away. Cercospora leaf spot starts as small dark spots with yellow edges on younger leaves and stems.
There are some non-pathogenic disorders, too. Misshapen carrots can occur if the soil is dry at the three to four leaf stage. Hairy carrots indicate either too little water or too much nitrogen. Also, if carrots are spaced too widely, they will be more likely to split, and the overall yield will be reduced.
Harvest
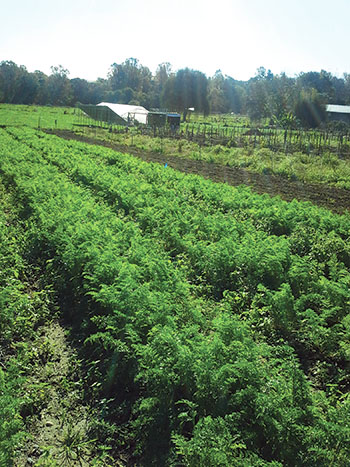
Carrots develop flavor and color at the same time, and harvest can begin as soon as they look and taste right. Carrots left in the ground too long get woody and may crack, get pithy and bitter. If the soil is dry, water just before harvest. This will ease the harvest mechanically and also improve the flavor of the carrots.
In the fall, we clear and store root crops in the order of cold tolerance, starting with potatoes after the frost, then turnips, celeriac and winter radishes. Then, kohlrabi and beets. Carrots come next. Only parsnips stay in the ground longer.
How you harvest carrots depends on the scale of your farm, the needs of your market and your equipment. You can mow off the tops, then undercut with machinery, then lift. Or you can use the tops to help get the carrots out of ground, as we do, loosening them with digging forks. We collect the carrots in carts. Ensure gentle treatment of roots while harvesting to prevent bruising and injury. Wounds and abrasions can lead the crop to pick up bacteria from the environment.
Trimming, washing and sorting
After harvest, prompt cooling is important. Washing will cool the crop, but until they meet the cold water, use damp burlap, dark shade cloth, or the shade of trees, buildings, or a truck.
Our method is to bring the harvested roots to the shade to trim, wash, sort and bag. When we harvest carrots for immediate use, we snap the tops off at the junction of foliage and root. When we harvest for storage, we trim with scissors to leave ¼” (0.5 cm) of greens. It is quicker to tear the leaves off, but this can cause the crop to need extra storage space.
There are rotary barrel root washers for $2,500 to $3,000, or you can make your own following designs online. Some have the barrel partly submerged in water so that the roots get soaked on each rotation. Others include perforated piping, delivering fresh water constantly. We are still using tubs.
As we trim, we put the roots into water. When the tub is full we give the roots a quick rub over and put them into clean rinse water. After rinsing, we sort, putting storable ones in one bucket and cull in a different-colored bucket. Storable are sound, reasonably large. We made different sized holes in a special bucket lid, to help new people get an idea of size. Cull includes small carrots (less than ¾” (2 cm) diameter, less than 3” (8 cm) long) or damage (deep holes, soft spots, fresh complex cracks). Open dry cracks or snapped-in-half roots may heal over and store just fine.
Once a storable bucket is full, we let it drain thoroughly before bagging in a well-perforated plastic sack. After the fall harvest, we spread the carrot leaves back on the beds, because it is too late to sow cover crops to protect the soil.
Storing
Mature root vegetables will keep for months at 32-40°F, (0-4°C) with 95 percent humidity. Those with large quantities of carrots will probably opt for electrically cooled storage.
Some people store root crops without washing, but cleaning them is harder after the soil dries on them. Washed roots store as well as unwashed ones and avoid the discoloration that can happen to unwashed carrots in storage. Don’t store carrots with apples or other fruit, or large amounts of cut flowers, or sprouting crops. The ethylene these crops give off can spoil the taste of carrots, removing the sweetness and leaving them tasting soapy or bitter.
In-ground storage
Depending on the severity of your winter, some cold-hardy root crops can be left in the ground, with about 12” (30 cm) of insulation (straw, dry leaves, chopped corn stalks, or wood shavings) added after the soil cools to refrigerator temperatures.
Hooped row covers or polyethylene low tunnels can top the organic mulch. There could be losses to rodents, so experiment on a small scale to see what works for you. This method can be used for storage of hardy crops deep into winter, and for less-hardy crops until early winter. In colder regions plan to remove the roots before the soil becomes frozen, or else wait for a thaw.
Pam Dawling works in the 3.5 acres of vegetable gardens at Twin Oaks Community in central Virginia. Her books, “Sustainable Market Farming: Intensive Vegetable Production on a Few Acres”, and “The Year-Round Hoophouse”, are widely available, including at sustainablemarketfarming.com, or from Growing for Market. Pam makes presentations on vegetable growing topics, does other teaching and consultancy. Her weekly blog is on her website and on facebook.com/SustainableMarketFarming.


