This article originally appeared in the January 2021 issue of Growing for Market Magazine.
The previous two articles in this series (from the February and May 2020 GFMs) focused on adding winter storage and sales to your farm with tips on growing, harvesting, and post-harvest handling for successful winter storage. This article outlines designing and building a facility for long-term vegetable storage. A well-designed storage facility enables you to store high-quality vegetables many months after harvesting and thus access lucrative markets starved for local produce during the winter.
Features of a winter storage facility
The goal in building a winter storage facility (a.k.a. modern root cellar) is to create a climate-controlled space that is reliably effective, energy-efficient, and meets the needs and workflow of your farm. Ideally, the storage space should be adjacent to a washing area and be directly connected to a heated space where produce can be washed and packed coming out of storage. Easy access is another important feature both for vegetables coming in from the field and going out for delivery.
As discussed later, it’s advantageous to use dug-out structures for storing winter vegetables to improve insulation and take advantage of ground heat. Whether dug into a hillside or buttressed with soil on flat ground, the main storage facility should not require stairs or ramps to access, but rather have an entrance where vegetables can easily be driven or rolled in from the field.
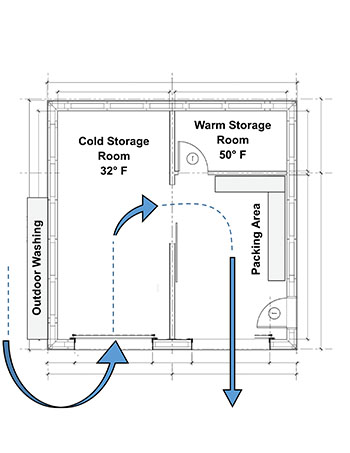
Ideally, winter vegetable storage facilities are located near outdoor washing areas and are connected to a heated space for washing and packing. Facilities should be designed for efficient workflows, including easy access from the field and easy access to storefronts or loading areas for delivery vehicles. All images courtesy of the author.
Regardless of size, there are some essential design features of modern root cellars you should consider including: (1) maximizing ground contact while insulating above the frost line. (2) climate control systems that include cooling, heating, and humidification. (3) fresh air intake and circulation within the storage area and (4) plans for handling heavy and bulky bins. With these in mind, size is a good starting point for designing a space for winter vegetable storage.
Determine the right size
The size of your storage space will determine your capacity to store and sell produce during the winter. Unlike the constant flux in walk-in coolers during the summer with vegetables regularly entering and leaving as they’re harvested and sold, winter storage spaces need the capacity to store the entire harvest at once. You may have some flexibility during the fall to stretch your capacity by leaving some veggies unharvested in the field when your root cellar is full. However, there comes a day each year when outdoor temperatures become too cold to maintain vegetable quality (i.e., freezes) or harvesting efficiently (e.g., chiseling carrots out of frozen ground). When that day comes, the size of your storage facility determines inventory available for winter sales.
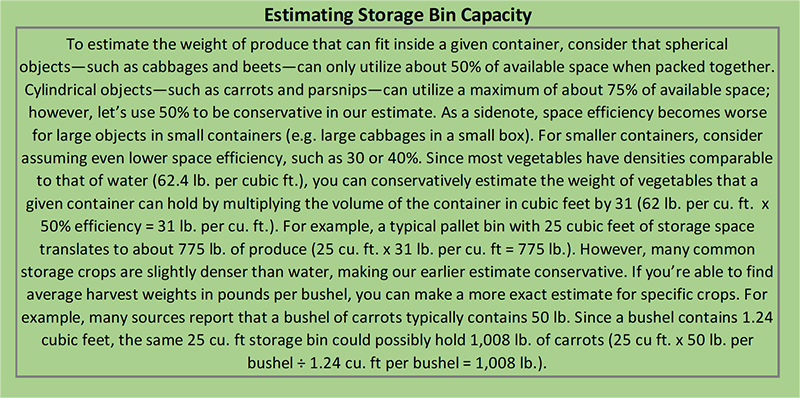
How big does your storage facility need to be? Unless you’re storing produce in bulk without containers (i.e., in piles), the size and number of containers that fit inside your storage room largely determines your storage capacity. See the box “Estimating Storage Bin Capacity” to calculate how many pounds of produce your storage bins can hold.
To answer the question of size, you need to know how many containers or bins are needed to store your expected harvest. For example, if you expect to harvest 18,000 pounds of produce and your pallet bins have 25 cubic feet of space, you might need 24 pallet bins [48” X 40” X 31” outer dimensions] to hold that amount, or 600 cubic feet not including the extra space for the pallets’ outer dimensions, space for airflow, and for moving containers in and out. A storage room measuring 13’ X 12’ with 8’ ceilings (1,248 cubic feet) might fit this need (see diagram).

In addition to your storage bins, storage rooms need extra space for airflow and moving bins in and out. Bins should not be stacked higher than the evaporator of your cooling system for two reasons: (1) Bins above this height will disrupt airflow. (2) Produce in these bins might freeze if the temperature drop across the evaporator is large. In “On-Farm Cold Storage” by the University of Wisconsin Extension, authors Scott Sanford and John Hendrickson recommend at least eight inches between bins and endwalls (i.e., walls in the direct path of airflow); four inches between bins and side walls; and twelve inches between bins and the ceiling. This extra space also provides some protection from cold spots on the walls or ceilings that tend to freeze produce.
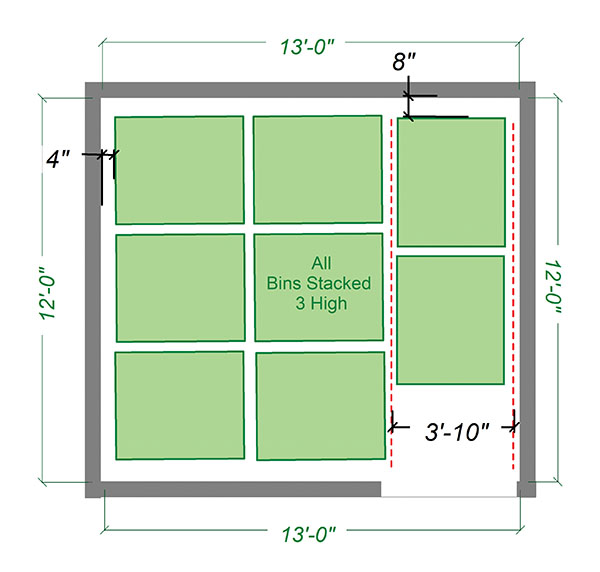 This storage room measuring 12’ X 13’ X 8’ (1,248 cubic feet) will conservatively store 18,000 pounds of produce. A total of 24 bins (green boxes) each measuring 48” X 40” X 30” (25 cubic feet) are able to stack three high with 18 inches of headspace. There are eight inches between the endwalls (i.e., the walls in line with cooling fans) and bins and four inches between sidewalls and bins to allow for airflow. A travel lane slightly wider than the bin width allows for bins to move in and out of the cooler on a pallet jack.
Beyond considerations of room size, the containers you use also determine your handling workflow. I break storage bins into two general categories: those you can lift by hand and those you can’t. Large bins allow you to be more efficient both packing and handling, and they use storage space more efficiently than smaller bins. However, larger bins require special handling equipment such as forklifts, pallet jacks, and bin flippers.
Large bins also require more space to move around. In the diagram of the bin layout in an example storage room, a lane slightly wider than the bins was needed to allow access with a pallet jack. Containers small enough to lift by hand are less expensive than larger bins, do not require additional equipment to move around, and can fit into smaller spaces to make full use of the space in a storage room. That said, smaller bins are less efficient to load and handle. Additionally, you should not underestimate the physical strain of lifting bins by hand. Bending, twisting, and lifting heavy bins over your head are recipes for back injuries if you’re not careful.
Regardless of size, storage bins should be strong, stackable, and (preferably) nestable for storage. They should also be easy to clean and sanitize. Large bins should be compatible with your means of moving them (i.e., have slots for forks). Bins designed for good airflow allow you to be flexible with what you store. I use polyethylene bin liners with most veggies I store, making airflow less important, but there are several crops, such as squash or onions, which appreciate holes for ventilation. Of course, your containers can change as the farm business evolves, but it’s important to consider your initial setup to inform other aspects of your storage facility and handling procedure.
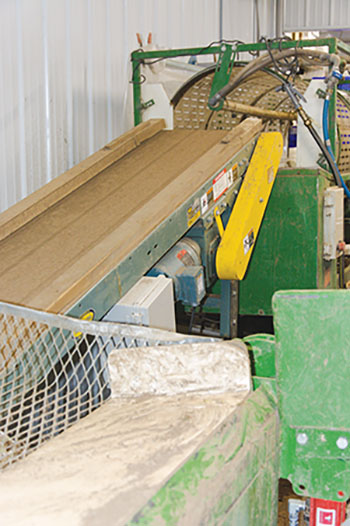 The system at Food Farm in Wrenshall, Minnesota, for loading pallet bins of produce into a barrel washer. A bin flipper (foreground) loads vegetables onto a mesh staging area. From there, workers push veggies onto a conveyer belt which feeds into a barrel washer. Photo by the author.
Building the root cellar
Depending on your resources and needs, you will either be building new or retrofitting an existing structure to function as your storage facility. Either option has pros and cons. A new facility can be built with your exact needs and specifications in mind, while a retrofitted facility can prove completely functional but cost much less than a new building. Either way, you’ll have the same goals for function and performance.
Most of the following considerations are more pertinent to newly built structures, but the concepts apply equally to retrofits. I will not cover all aspects of construction, and it may be wise to consult many resources including books, local contractors, architects, and structural engineers to ensure your facility is structurally sound, conforms to local building codes, and has all the necessities for functionality such as electrical and plumbing hookups. You may also want to visit other local farms to get ideas. Even if other farms aren’t currently storing produce in the winter, some summer-time techniques for harvesting, packing, and handling can equally be applied to winter vegetable storage.
Insulation and ground contact
Cold storage rooms operate under a different set of conditions in winter than in summer. First, common target temperatures for winter storage are often colder than in summer walk-in coolers: usually 32°F versus 38°F. More importantly, the outdoor temperatures are colder for winter storage. When mean outdoor temperatures are below freezing for at least a few months of the year, heating becomes a major concern for maintaining optimum temperatures in your storage room. Insulating in the right places will help you prevent heat loss while accessing free heat energy from the ground.
Regardless of local climate, insulate as much as possible between your cold storage room and the outside air. This insulation will aid you in cooling your storage room during warm weather and keeping vegetables from freezing during colder months. Soil is an excellent insulation barrier in addition to modern insulation such as mineral wool batts, rigid foam board, or closed-cell spray foam. I suggest buttressing exterior walls with as much soil as possible and even consider a soil-covered roof (though this option is more expensive than building a conventional roof).
Always insulate exterior walls to at least the frost depth. You’ll have to do some sleuthing to find your local frost depth, but local university extensions and weather agencies may have this information. When searching, keep in mind that frost depth varies from year to year. Just like an area might experience a 100-year flood, a particularly cold winter with little snow might produce a frost depth only seen once in 100 years. Knowing this, you might want to insulate 25 percent deeper than the average frost depth and place a horizontal “wing” of insulation extending out into the soil. This “wing” creates a barrier to frost penetration while also protecting your walls and foundation from frost heaving.
Deciding whether to insulate walls and floors below the frost line is more complicated and depends on your desired use for the structure. An essential concept to keep in mind is that heat energy always flows from warmer things to cooler things. If left uninsulated, heat energy will flow from the soil and through the floor and exterior walls (below the frost line) into a 32°F storage room.
During the winter, this natural heating will offset, or possibly eliminate, the need for supplemental heat. On the other hand, this influx of heat energy will make the storage space more difficult to cool to your desired temperature in the fall. If you might use the facility as a summer-time cooler as well, your storage room will require more energy to cool if your desired room temperature is lower than the temperature of the surrounding soil.
Carefully install insulation to avoid thermal bridging. Thermal bridging usually occurs through and around structural components of a building, allowing cold to seep through. A common example is heat loss through and around wall studs in walls insulated only with batts in the stud cavities. Beyond the obvious reduced R-value and increased heating and cooling costs, thermal bridging can create “cold spots” in your storage room and exacerbate problems of condensation on interior walls.
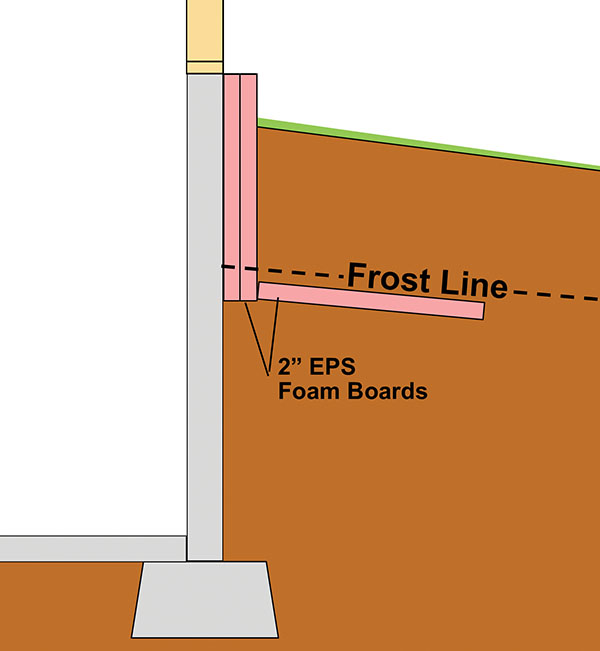 Insulating exterior walls to at least the frost line will protect your storage room from below-freezing temperatures while allowing access to heat energy from deeper, unfrozen ground. A horizontal wing of foam board insulation measuring 2 to 4 feet protects against deeper frost penetration. Notice the foam wing is pitched slightly away from the building to encourage water drainage.
Without adequate air circulation, vegetables stored near cold spots are liable to freeze. Few things are as disheartening as discovering a bin of vegetables that have frozen at some point during the winter. Potatoes and squash are particularly nasty, often seeping out smelly liquids when thawed. Cold spots on interior walls also attract condensation, which can drip onto produce and cause problems with mold and decay.
The dew point—the temperature at which water vapor condenses to liquid droplets from air—depends only on temperature and relative humidity. The closer relative humidity gets to 100 percent, the closer the dew point temperature gets to the air temperature. For example, in a 33°F storage room at 70 percent relative humidity, the dew point is 25°F. At 95 percent relative humidity, the dew point is 32°F.
Thus, the higher your target relative humidity, the more sensitive your storage room will be to collecting condensation on the walls and ceiling. As a sidenote, this is why I, along with other farms such as Food Farm in Wrenshall, Minnesota, choose to keep high-humidity crops stored inside plastic bags. That way, vegetables can have a high humidity micro-environment while avoiding the inevitable problems of condensation inside a humid storage space.
For insulation, I recommend faced EPS (expanded polystyrene) foam board, mineral wool batts and closed-cell spray foam. Although fiberglass batts are more common and less expensive than mineral wool, fiberglass insulation absorbs moisture, leading to reduced R-value and mold and mildew problems. Store It Cold, the makers of the CoolBot®, also recommend against fiberglass batts for cold storage applications, noting, “mold will form, R-values will decrease, and you will be disappointed.” Instead, use mineral wool, which does not absorb water unless completely immersed, for insulating between studs.
To prevent thermal bridging near studs, cover walls with EPS foam board, which retains higher R-values in cold temperatures than comparable polyisocyanurate panels, such as RMax®. EPS foam board also can be used for insulating exterior walls below grade and under concrete slabs. Compared to XPS (extruded polystyrene) foam board, EPS is less expensive, retains less moisture, retains more of its initial R-value over time, and is more environmentally friendly to manufacture.
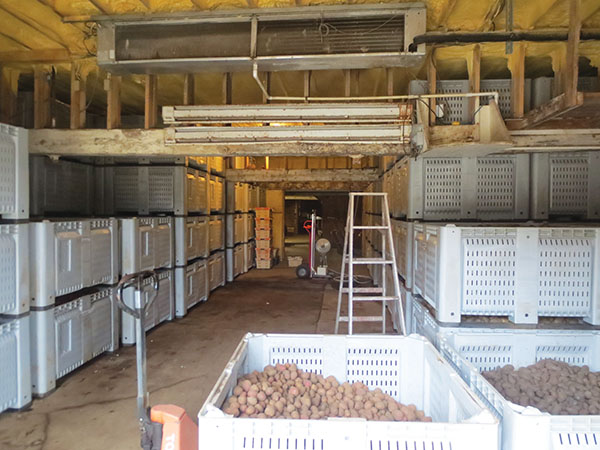 The winter potato storage room at Vermont Valley Community Farm in Blue Mounds, Wisconsin, is the retrofitted basement floor of a barn on the property. Closed-cell spray foam covers the ceiling and upper walls, while portions of the lower walls are below the frost depth. Photo by the author.
XPS boards usually have higher compressive strengths than EPS, but EPS foam boards rated to more than 15 to 20 psi are suitable under most concrete slabs. Closed-cell spray foam is the most expensive option but can require less labor to apply than other types of insulation. It’s a great choice for retrofitting old structures to function as cold storage units, but it often requires professional help to apply.
Vapor and air barriers
Properly placing a vapor barrier for a well-insulated storage room will help prevent excessive condensation inside the wall cavities and ceiling of your facility. The rule of thumb with vapor barriers is to place them on the warm side of a structure. That way, warm (relatively), moist air is less likely to contact cold surfaces within the wall and ceiling and condense water onto structural components. Over time, this moisture can lead to problems with the structural integrity of the building and mold buildup.
For summer-time coolers, vapor barriers usually go outside the insulation and most likely immediately under the sheathing or other exterior covering. In most northern climates, outdoor temperatures are often lower than the storage temperatures (around 32°F). For this reason winter cold-storage spaces, like homes in cold climates, usually have vapor barriers inside the insulation, likely just under some kind of water-resistant wall panels such as sheet metal or FRP (milk board). Placing the vapor barrier inside, rather than outside the insulation will prevent the warm, moist air in your winter storage room from condensing water onto the structural components of your building.
If your storage room will be pulling double duty, functioning as both a summer- and winter-time cooler, you’ll need to think a little harder about where to place the vapor barrier. The goal is to minimize opportunities for escaping and entering air to reach the dew point inside the walls and leave condensation on structural components such as studs, beams, or sheathing. This can easily occur when temperatures on the cold side are far below the dew point temperature of the warm side. For most temperate climates, cold storage facilities will have a higher relative humidity on the “warm” side during the winter than in summer. Thus, condensation is often a greater concern for winter-time storage.
For these conditions, vapor barriers should go on the inside of insulation and building structural components. It’s imperative, though, to use insulation that can tolerate some summer-time condensation and to give this moisture a method of escape. In areas with especially humid summers or severely cold winters, it may be wise to move both the insulation and vapor barrier completely outside the building envelope (i.e., outside the exterior sheathing).
This technique has been researched and refined by the Cold Climate Housing Research Center (CCHRC) in Fairbanks, Arkansas, and goes by the acronym REMOTE (Residential Exterior Membrane Outside Insulation TEchnique). You can find resources for this construction method on the CCHRC website (http://cchrc.org/remote-walls/). The gist is that both the vapor barrier and at least two-thirds of the total R-value go outside the structural sheathing. This way, the dew point and all condensation occur outside the building envelope. EPS foam board is usually used as the exterior insulation because of its resistance to moisture absorption. Whatever you do, it’s important to avoid creating double vapor barriers—such as layering foam board on both the interior and exterior—where moisture can get trapped inside a wall and cause problems.
Tips for dug-out structures
Building a winter-time vegetable storage facility can be similar to building a home with a walk-out basement, with at least two sides of the structure built into a hillside or buttressed with soil if on flat ground. If building a new facility, this means there are added costs and considerations for excavating a site, managing water drainage, and ensuring it’s all structurally sound.
To prevent water infiltration into dug-out structures, be sure to use generous amounts of water-permeable backfill such as gravel at least to the base of the footer. This will also prevent frost heaving in cold regions. If building into a hillside, place drainage tile along the perimeter of the footer and attach it to soak-away pipes to drain excess water down the hill.
I highly recommend pouring a concrete slab for ease of moving heavy bins, ease of cleaning, and strength. The slab for a typical garage is 4 inches thick and reinforced with rebar and or steel mesh. Depending on the overall weight of stored produce, it may be wise to pour at least a 6-inch reinforced slab to handle the maximum seasonal load of vegetables. If either the slab area or the planned weight of vegetables is large, you may want additional foundation footings to support the heavy load. A great footing option for the do-it-yourselfer is The Foothold Insulated Concrete Form (ICF) system, which makes it possible to pour concrete footings without wooden-plank forms (https://thefootholdicf.com/). However, do yourself a favor and consult with a structural engineer to ensure your design is appropriate for the planned use.
The walls of dug-out structures, similar to residential basements, are usually made of concrete or masonry. Insulated concrete form (ICF) walls are excellent choices because of their strength, high insulation value, and relative ease in setting the forms. Fox Blocks® is a commonly used manufacturer of ICF walls and has lots of resources on their website (https://www.foxblocks.com/products). The thickness of either ICF or bare concrete walls will depend on their height and the depth of soil contact. Again, contact a local contractor or structural engineer to ensure your walls are structurally sound.
Another option for well-insulated exterior walls are structural insulation panels (SIPs). Certain manufacturers make foundation SIPs, which have pressure-treated CDX plywood on the exterior side specifically designed for below-grade construction. If using SIPs to retain soil, be sure not to exceed their lateral pressure ratings. The exterior walls of a dug-out structure must be waterproofed and sealed to prevent ground water from intruding inside the storage space. Because of the high risk of water infiltration in dug-out structures, it’s a good idea to install floor drains that allow any seeping water to escape.
Conclusion
At this point, you may be thinking about the high upfront costs of building a winter-storage facility. It’s certainly true that starting an enterprise of long-term storage and winter sales requires a significant investment upfront. For example, building a new 24 foot X 24 foot facility, including 2,100 cubic feet of cold storage and a heated space for washing and packing, will cost me roughly $50,000.
That said, this investment will allow me access to winter-time markets in my hometown of Fairbanks, Arkansas, that few other farms are currently occupying. This viable business model not only opens new markets, it provides more local food options to consumers year-round and helps build trust in local food systems. The more farms that adopt long-term storage, the more secure our local food systems will be. The fourth and final article in this series in the February 2021 magazine will cover environmental controls specific to winter storage rooms including cooling, heating, humidification, and air-exchange.
Sam Knapp has experience farming in Alaska, Sweden, and Wisconsin, and spent the last three years running a farm in Michigan’s Upper Peninsula focused on long-term storage and winter sales. Sam now lives in Fairbanks, Alaska, where he plans to start a new farm business centered on winter vegetable storage.

 This is the first in a three-part series about why and how to add long-term vegetable storage to your farm to bolster off-season sales.


