I don’t know about you, but there have been times in my life when my seed storage got out of control. It happens innocently enough, you come back from seeding in the field & you quickly drop your seeds into a bin because you need to get to your CSA delivery. You get your latest seed order of impulse buys you made without clearly fitting it into your crop plan, and you drop those into the seed bin to dream about later. You’re tidying up at the end of the season and you just want a break so you pile a bunch of seeds that were laying around into that bin.
And then it’s time to get ready for the coming growing season. And you don’t even want to look at that box of jumbled seeds. Maybe it would be easier to just order new seeds! It sounds like you need a good seed sorting.
Step 1 is the Marie Kondo step where you touch each seed package and then place the seed into a specific group.. Step 2 is to then organize the seed that you’re going to rely on next year. And step 3 is to record how much seed you have on hand.
Pump up the music, grab some sharpies and go and get those seed bins. It’s time to get organized.
Step 1 - Sort your seed into 4 groups
You can use cardboard boxes, Rubbermaid bins, or simply a kitchen table with a place for 4 piles.
Label each of your containers for one of the following groups:
- Group 1 - Next year’s seed
- Group 2 - Backup seed
- Group 3 - Remnant seed
- Group 4 - Seed to move on
And now you’re going to pick up each seed pack one after the after and put it into one of those groups based on these questions:
Did you like this variety? If you did not like how the crop grew or what the vegetable tasted like and do not ever want to grow it again. Then drop that seed into pile #4 - Seed to move on
If you liked the variety, you can then ask… Is there enough seed left to be worthwhile? If there is so little seed left that it will be a hassle to deal with you, you might simply want to drop it in pile #4.
However, if there isn't much seed but this is a variety that you love, and would be disappointed if it disappeared from seed catalogs one day, then you could drop this pack in pile #3 - Remnant seed.
If there is enough seed to be worth planting next year, move on to the last question… Will the seed germinate reliably next year?
Check to see if there’s a label with information about the “germination test date” or what year it was packed for. In most cases, the seed should be good for 1-2 years after you purchase it. If the seed is older than 2 years, drop it in pile # 3 or #4.
If the seed is 1-2 years old, then look for a germination rate and try to remember how the seed behaved in the field. If the germination rate is on the low side or you remember being disappointed with how the seed germinated in the field, then take your sharpie and write the purchase year and the words BACKUP across the front of the seed pack. Then put this seed in pile #2 - Backup seed.
You might also consider putting any leek, onion, or parsnip seed in pile #2. These are seeds that are known to not maintain good germination rates.
And this leaves you with seeds from varieties you like with enough quantity to be worth planting and that you’re feeling confident will germinate. Write the year in Sharpie across the front and put this seed into pile #1 - Next year’s seed.
Group 1 - Next year’s seed
These are seeds that you are confident will germinate well next year. And these seeds are varieties that you want to grow again. You might need to purchase more seed for these varieties next year, but you’ll sow this leftover seed first to use it up.
Group 2 - Backup seed
These are seeds that might have lost some of their germination potential. You don’t plan on planting these, but it’s nice to have them on hand in case the seed you ordered goes out of stock or doesn’t arrive in time, or maybe you need to reseed something and you used up this year’s seed.
Group 3 - Remnant seed
Remnant is the seed you keep in case the variety is ever discontinued or very difficult to source. Having some remnant seed means that you have the possibility of growing it out and saving the seed to make it available again. This is your seed bank, (it’s probably only worth keeping open-pollinated seed since hybrid seed won’t breed true to type.)
Group 4 - Seed to move on
It could be that you give this seed away to another grower. Or maybe this seed would be better as chicken feed or compost. Or take out a glue stick and make some seed art!
Step 2 - Organize your seed inventory
Take a pile once you’ve sorted your seed into 4 groups take the first two groups and organize them into your seed inventory. (Remember that group 2 should be marked with the words BACKUP to keep it distinct).
Now you’ll want to have two levels of classification for your seeds. Level one is a few big containers and level two will be a bunch of smaller containers that fit in the bigger containers. At Tourne-Sol we use Rubbermaid bins for level 1 and Ziploc bags for level 2.
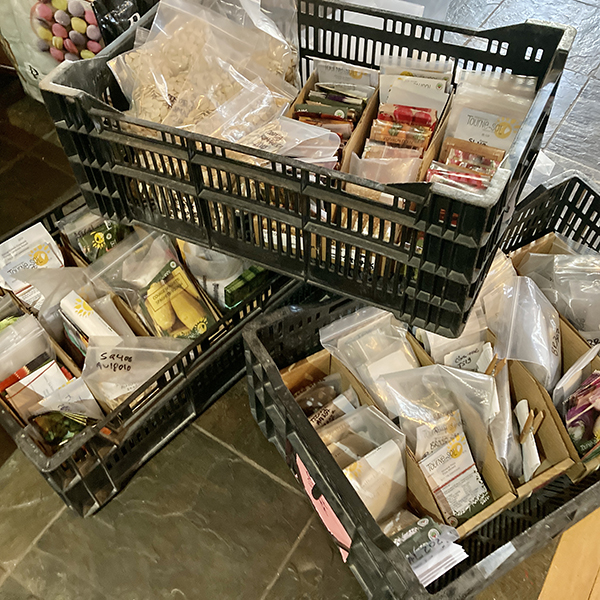
Here are three bins I recommend for your seed inventory; they are categorized by where you’ll use the seed and how often:
Bin 1 - Seed to start in the Nursery (sown once a year)
Because these seeds are not used much, you’ll want to keep them separate from your other nursery seed so that they aren’t in the way.
Here are 3 Ziplocs you might have in this bin:
- Allium seed together - onions and leeks
- Herbs and flowers that only get planted once
- Tomatoes, peppers, and eggplants
- Winter Squash and Melon seed
Bin 2 - Seed to start in the Nursery (sown many times a year)
This bin would be divided into at the least:
- Cucumber and summer squash seed that is sown a couple of times a year
- Crops that are sown every 2 weeks through the season (brassicas, lettuce, some flowers, etc.)
Bin 3 - Seed to directly sow in the field
This bin would be divided at the least into:
- Roots
- Greens
- Peas/Beas
You should probably lump seeds together based on what crops fit together in your crop rotation.
Adapt this to your farm
You can mix this up based on what fits your farm. You want to make it easy to quickly grab only the seed that you need when it’s seeding time. And you want it to be easy to put the seed back where it came from when you’re done.
Step 3 - Record how much seed you have
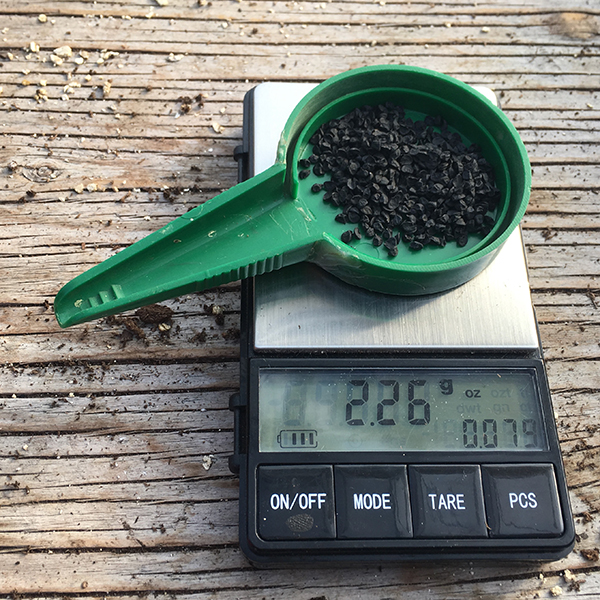
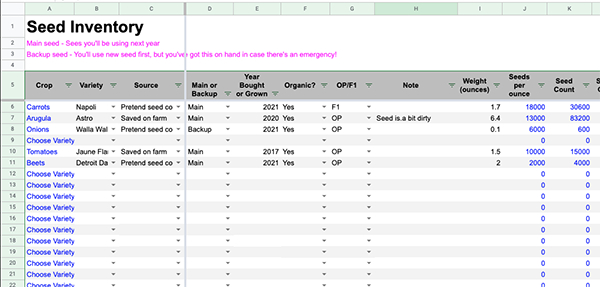
When you’re putting together your crop plan for next season, you should go through and keep track of what seed you have on hand. Set up a spreadsheet where you can list the crops and varieties. At the least, you'll want to weigh the seed and record how much seed you have on hand.
This way you can reduce the quantity of seed you have on hand from the seed needs in your crop plan.
If you want to get a bit fancier, I’ve put a spreadsheet together for you that you can download here. It lets you closely link your seed inventory and your order together.
However you set yourself up, you'll need to update your seed inventory sheets every year before placing your next seed order.
One last step…
And now that you know what seed you have on hand, it’s time to hit that crop plan and figure out what seeds you’re missing. Then you can order more seeds!
But this time, when the seeds arrive. Put them in the right part of your seed inventory!
Dan Brisebois is co-author of Crop Planning for Organic Vegetable Growers and blogs at goingtoseed.net. He loves solid farm planning and great management. He is also a spreadsheet maniac. Dan is also one of the farmers at Tourne-Sol co-operative farm. Tourne-Sol produces certified organic seeds and vegetables for their online seed store and 500 weekly veggie baskets.


