I’ve been growing produce on my farm in East Central Indiana since 1997. Nine years ago, I put up my first 20 x 96 Polar Cub hoophouse, and declared I’d never need another one. However, after reading Eliot Coleman’s enticing accounts of moveable hoophouses, I couldn’t resist the idea.
Six years ago, I began making plans to try to build one. Purchasing a kit that was designed to move seemed cost-prohibitive to me. So with the help of the folks at the local Amish business that sold farming supplies, including hoophouses, I looked at how we could add extra bracing to a 25’x48’ stationary structure to adequately strengthen it enough to move.
My biggest concern was heavy wind. We live in a fairly windy area. In fact, since erecting my first moveable hoop, our farm has been surrounded by a wind farm.
Shortly after I had decided to really build it, I saw a photo on the front of Growing for Market of Ben Hartman and Rachel Hershberger’s hoop impaled on the roof of their barn (GFM March 2010). There was an accompanying explanation of how using a structure that was not intended to move, had not managed to hold up to the heavy winds in their northern Indiana location, about 3 hours north of my farm. Needless to say, I started to question the wisdom of my plans.
It seemed like the two biggest issues for mobile structures were adequate bracing, and making sure that the structure was well anchored. The only additional bracing we added was to attach diagonal pipes from the purlins to the uprights at three different locations. I had to raise them up on the sides eventually, because I would run into them if I was wearing a hat or looking down.
I decided to rely primarily on the track that the house was to run along for an anchor, although I also installed large earth anchors at the four corners. My then 15-year-old son welded the track for me using steel black pipe, a heavy duty pipe. It is long enough to allow for three moves of the 48 foot house. He welded T’s along the pipe every 10’, which we set in concrete.
We spent a lot of time with a laser level trying to make the pipe as level as possible. Because there is a drop in the topography where it is located, it means that at one end it sits on the ground, and at other points is almost a foot above the ground. It was also important for the two parallel sides to be level to each other. That whole process was very tedious.
The actual construction was a bit more challenging than with a stationary hoop, and I hired a local contractor to do the building. He used a hay wagon and a temporary wooden brace to stabilize it as it was being built.
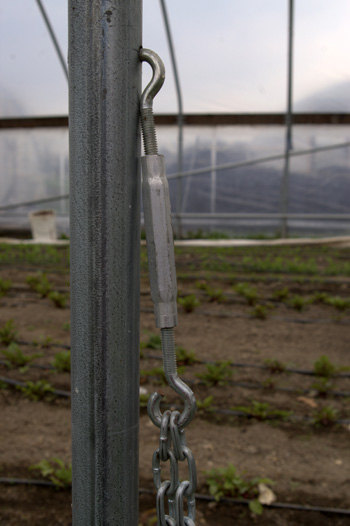
To anchor the structure, we used turnbuckles, bending the loop ends open into hooks, and attaching them to holes in the uprights of the hoop. Then we ran chain from the lower hooks on the turnbuckles, around the track, and back up to the turnbuckles. At the corners of the hoop, the chains are attached to the earth anchors. There are chains on every other upright, for a total of seven chains on each side of the hoop.
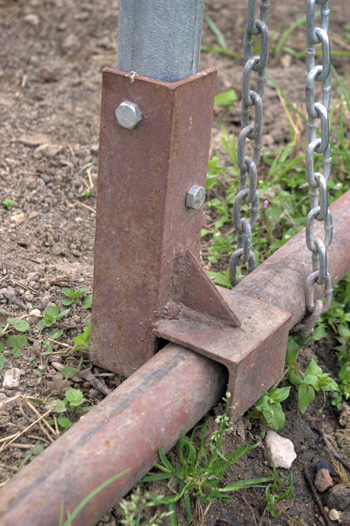
I was deterred by the high cost of wheels that were made specifically for this purpose, so instead tried using old lawnmower wheels initially. They couldn’t handle the weight, so my son welded brackets to each upright which allow us to slide the hoop along the track. I like the fact that they keep the sides from bowing in or out.
Below left is a turnbuckle with one of the eyes bent into a hook so it could be removed when the house needs to be moved. On the right is one of the brackets the homemade moveable house slides along. All photos courtesy of Wendy Carpenter.
However, moving it is a big production. I put cheap vegetable oil along the track, and using a pickup truck and a lawn tractor chained to the ends, we pull it back and forth. One of these days I will probably buy wheels!
One concern, especially with gothic style hoophouses that have higher sidewalls, is the ability to adequately protect the curtains from blowing up. This is compounded with my moveable hoops because they sit on a track, which raises the sidewalls even higher. Figuring out how to attach a zigzag rope at the bottom edges of the curtains created a quandary for me, because the only pipes I could attach a hook to are the pipes of the track that are ten feet apart. This wasn’t adequate. So I strapped several 20’ 2x6’s to the track uprights, and then placed hooks that the rope could loop through every 4’ along the 2x6’s.
This works well along the parts of the track where it doesn’t sit directly on the ground. In those locations I just pound some rounded metal posts upright into the ground right next to the base of the bottom curtain bar and cross my fingers. One season when the wind was just wrong, the curtains did blow up and come down on top of the metal bars, which ruined the plastic.
Since then, I added a gear operated hand brace which is attached to an upright post at one end of each curtain, and this has added to the stability of the curtain.
One other design challenge is the need to build endwalls that are stable, but versatile enough to raise above already established vegetation, and in some cases even trellising.
The total cost for the structure, including track was under $5,000. Since I built it several years ago, specific amounts are probably not that useful. However, it seemed relatively inexpensive, and it is still working fine.
When Indiana joined the NRCS EQUIP High Tunnel Initiative, the local staff contacted me to see if I was interested in applying for funding. I decided to put up a second moveable hoop. However, to be compliant with the guidelines it needed to be a kit that was designed to move. I purchased the kit for a second 25’x48’ structure from the same Amish supplier, and it was remarkably similar to the one we had made. Like the first one, it is designed to make three moves.
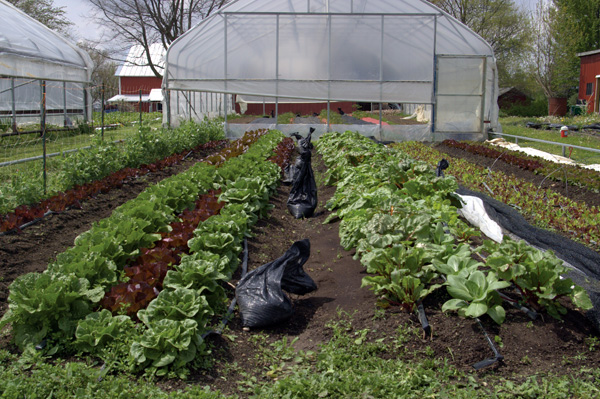
Below is one of the author’s moveable hoophouses after a spring move. The plot in front has head lettuce, peas, swiss chard, pac choi and lettuce mix. Tomatoes are being transplanted into the tunnel.
The track construction was the same, with the exception that it was made with lighter weight metal with the T’s screwed on instead of welded. This made me less trusting of using the track as the anchor.
We did not spend as much effort leveling the track as we had the first time, partly because the ground in the second site was slightly more sloped, but also because all the components were more flexible. We stretched a line to make sure the track was straight as we set it in concrete, measured to make sure the two sides were equidistant, and just eyeballed the rest.

Earth anchors were provided, although they are smaller than the ones I purchased for the first hoop. Again, they are spaced between every other set of uprights for a total of seven per side. Instead of using the cables that were provided for anchoring, we used chains, and switched from the Chinese made turnbuckles to American made ones which are much more user friendly.
The kit included significantly more bracing than the one we made, including cables that run diagonally along the length of the structure at the ceiling level. Additionally, it included a roll bar lock at the base of the curtain, that allows me to lock the curtains in place at the base. Because of the way it is constructed, I cannot use zigzag ropes in addition to the roll lock, and when the hoop is at the point along the track that is closest to the ground, I often have to dig out the soil in order to get the curtain bar in under the bar lock, which is not too convenient.
The biggest plus are the wheels! Two people can move it with relative ease just by walking and pushing on two corners. It doesn’t feel like such a big production to move as the other one does, and it’s okay if it’s muddy outside when it’s moved.
The cost was close to twice as much as the first one, although the EQUIP money offset that. If I had it to do over, I would make a few design changes to the first one, and adapt a stationary model again, this time using wheels.
It’s important to explain these design components to be able to compare them to a stationary hoophouse. There are things that I love about my moveable hoophouses. Salt and nutrient buildup are not at all an issue like they are in my stationary structure that is watered exclusively through drip irrigation. I don’t see disease buildup, and pests don’t overwinter in the moveable hoops the way they do in the stationary one. For example, the lettuce and kale in my stationary hoop are currently full of aphids, whereas this is not the case in the moveable hoops. I try to make sure that they overwinter in a different spot each year, to continue this trend.
So far they have withstood the wind. This past weekend we had five hours of 50 mph winds, and all was well. Several years ago there were reportedly wind gusts close to 90 mph in our area and the hoops were stronger than the Bradford Pear in my yard. They do have some protection from nearby barns and a grain bin to their west, which no doubt helps. However, I feel that the moveable hoops are no more likely to blow than my stationary hoops are.
I like the flexibility that their moveable nature provides in the spring and fall. One of them is currently sitting atop early beets and carrots that were transplanted and/or planted since the beginning of the year. The other is sitting atop transplanted Swiss chard, sugar snaps, romaine and other head lettuces. None of these crops would be terribly happy if they had to reach maturity in the temperatures that will soon be too warm for them in the hoops. But soon I’ll be moving them one move over to begin transplanting tomatoes and peppers in them.
Likewise, in the fall I can start cool weather crops outside in July and August, and then move the hoops over them once the tomatoes and peppers are finished up and it gets colder. It’s kind of like having a very long and versatile hoophouse for the price of a shorter one.
There are drawbacks however, especially in the winter. I find it impossible to seal the bottom edges of either of my moveable hoops as well as with my stationary hoop. Because the structure of the hoop itself does not touch the ground, there are gaps which are hard to seal. The size of these gaps varies depending where the hoops are positioned. At one end, the pipes lie touching the ground, and at the downhill end there is a 10-12” space between the bottom of the uprights and the ground.
I have tried several different versions of attaching plastic along a wire that I attach about a foot above the wheels and burying the edges of it. However, a gap can still form between where the curtains drop and where the top edge of the plastic on the wire hits. This is especially true for the end walls on the newer model.
The bottom line is, the crops I can overwinter in the moveable hoops are more limited than in the stationary one. I am located in zone 5, and find that my most reliable winter crops in the moveable hoops are arugula and spinach. Lettuce will do all right until sometime in December, but other winter crops have their quality compromised to such a degree that I don’t consider them marketable.
When I initially read Eliot Coleman’s accounts of the rotation possibilities, I envisioned moving the hoops back and forth with some frequency in the spring and fall. However, in reality I find that this is not always as convenient as it might seem. Weather conditions are one consideration. I like the wind speed to be under 9 mph when I am moving them, and the fall and spring are quite windy here. So that is definitely a limiting factor. In addition, for the model without wheels it needs to be dry enough that the tires of my lawn tractor have adequate traction.
The actual process of moving the hoops takes about five minutes. However, getting them ready to move and then reattaching them takes about a half day. This involves loosening chains and turnbuckles, adjusting end walls so they are positioned to move, removing the plastic that seals the lower edges, and then putting it all back together after the move. As a result, I find that I’m closer to 3-4 moves per year on average, which doesn’t optimize their full potential.
My position is that moveable hoops are a viable alternative for protected culture and season extension, but they are not the same as a stationary hoophouse and have a slightly different function. Each grower has to evaluate for themselves whether or not they are worth the extra cost and effort.
Wendy Carpenter grows vegetables on one and a half acres in East Central Indiana, where she is in her 20th season of market gardening. You can learn more about her farm on her website, www.christopherfarm.net or on Facebook at “our christopher farm.”


