We at Four Winds Farm in Gardiner, New York have developed a no-till approach to farming that uses a lot of compost – 40 yards per acre. When we first developed our model 20 years ago, our market garden was small, only 1.5 acres, and we got our compost from an off-farm source. As we expanded, it made sense that we figure out a way of making our own compost.
Since we were certified organic, there were guidelines we needed to follow to make compost. We have an unlimited source of horse manure nearby that I mix with on-farm generated cow manure. Initially I mixed the two manures with a tractor bucket, formed a long windrow, and turned it with the tractor.
The problem I had was with keeping the temperature within the required range after turning the pile. Sometimes the temperature stayed above 131 degrees F., as is stated in the organic rule, sometimes the temperature dropped below 131 degrees. The organic rule also mentions using a static aerated method that requires no additional turning, but when I first looked into such systems, the bins and aeration systems were very expensive. Then I saw a picture of a system that just used pipes laid on the ground and the material piled on the pipes, and I thought, that would be easy to duplicate.
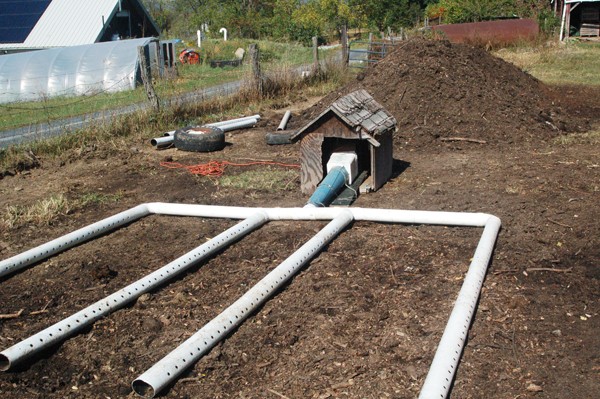
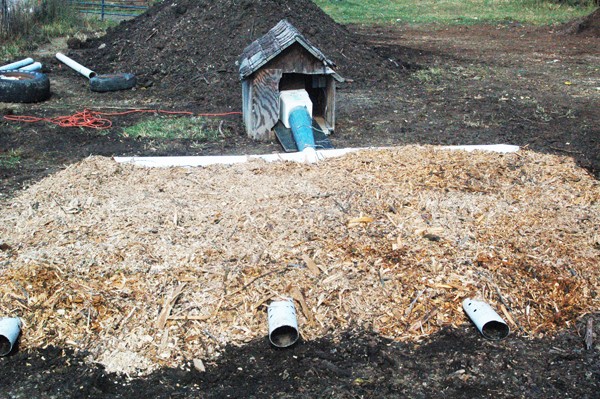
Here is the author's current four-pipe aerated compost pile setup without any compost on the pipes.
The blower is protected by the doghouse, and the air is forced into the compost from below by the manifold of perforated pipes.
I had an old duct fan that came out of a greenhouse, figured out a way to make the square opening in the housing into a round opening and attached two twenty-foot rows of schedule 40 sewer and drain pipe. I piled my mix of horse and cow manure on the pipes, plugged the fan in, and the manure did not heat up. After talking about my design with a friend, I realized what I didn’t see in the picture was a very important part of the system, a timer that turns the fan on and off.
The timer turns the fan on for a period of time, preferably 3 minutes, then off for a period of time, preferably 20 minutes. These timers can be purchased at a hydroponics store or online under hydroponics supplies and cost around $80. I put a timer into my system and was amazed at how well it worked. The pile heated up to 150 degrees in 2 days.
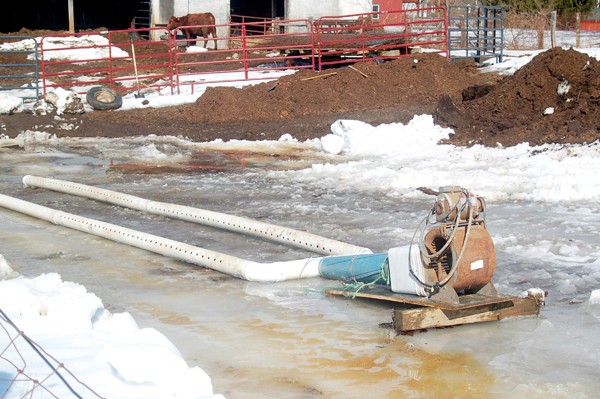
This is how the author started out, with only two aerator pipes attached to a greenhouse blower fan.
My next question was how big a pile could I make. I went from two twenty-foot rows to four twenty-foot rows of pipes and had success. I then expanded to four thirty-foot rows of pipes and still had success. What I found really amazing was that I could actually control the temperature of the pile by adjusting the timer. If the pile was heating up too much, I could cool it down by letting the fan stay on longer. As far as having a pile that didn’t get hot enough, well, that rarely happened. When it didn’t heat up, it was because the material was too dry and I had to add water to the pile.

After my first year of using the forced air system, the problem I had was that the pipes flattened from the weight of the compost. The heat may have also had something to do with the flattening. So the next year I invested in SDR 35 pipes. Otherwise known as “sewer main pipe,” it is usually light green instead of white.
These came in 14-foot lengths instead of 10-foot lengths, so I started making my piles 28 feet long. Since I had at least four of the schedule 40 pipes that didn’t get flattened, I tried going to 38 feet long. That was successful so I bought 4 more SDR pipes and now do a pile that is 42 feet long.
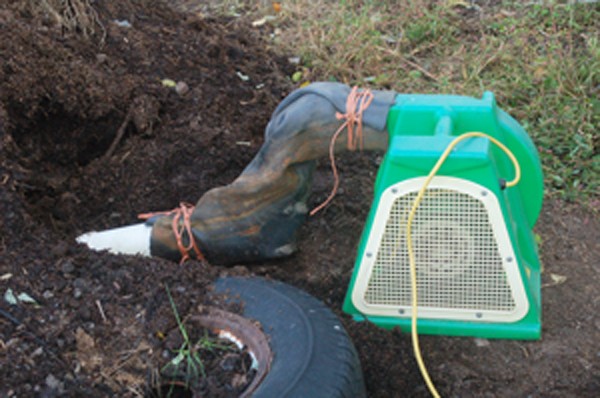
This is the author’s latest innovation, using a bouncy house fan connected to the manifold with an innertube to provide airflow under the compost pile.
The schedule 40 and SDR 45 pipes come either solid or with holes. It is best to buy the pipes with holes instead of wasting the time drilling holes yourself. I used solid schedule 40 for the header pipes. Since there is no weight on the header pipes, I didn’t need to replace them when I switched over to the SDR 45. A person could save a few bucks by using the schedule 40 for the header pipes.
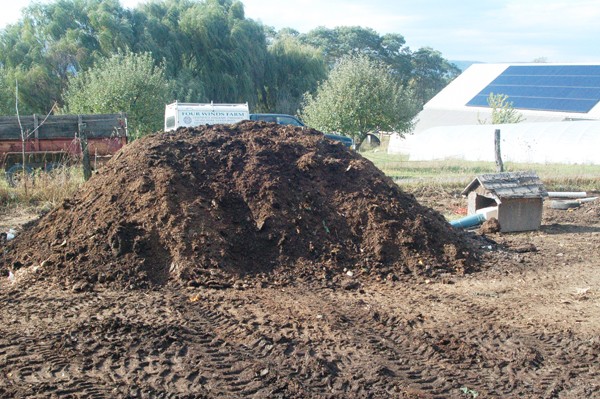
A common question I get asked is how long do I aerate the pile. The Organic Rule specifies that I only need to aerate the pile for 3 days. It takes me at least two weeks to pick up enough horse manure to do one cycle, so two weeks is my minimum. After two weeks, I remove the compost from the pipes and stockpile the compost, and then make more compost. Each pile gives me around 25 to 30 yards of finished compost, so I am now able to make more compost than I need.
The pipes are four feet apart, with 12 feet between the two outer lines. When I pile the compost on the pipes, the pile is 15 feet wide. These numbers do not follow any guidelines, it seemed to be what made sense when I first built the system.
When I am taking the pile apart, I remove the finished compost from the side of the pile, one row of pipes at a time. I get most of the weight off, pull the pipes out, and then remove the rest of the material. I tied loops of rope at the end of each section of pipe (it took me 2 years to figure out this trick), dig around with my hand until I find the loop of rope, and pull the pipe out by hand. Without the rope there is nothing to grab ahold of the pipes making it difficult to get them out of the way. I used to use a piece of rebar, but the rope is much easier. As I remove each row of pipes, I am able to drive in with the tractor and uncover the other rows of pipes.
Covering the compost pile is important, because rain will leach out valuable nutrients. At first I tried using a regular tarp but realized my mistake the following year. Plastic tarps biodegrade and when they do, you end up with lots of bits of plastic. Then I learned about the compost fleece that Compostwerks sells. This material does not biodegrade, it repels water but is breathable, allowing steam to escape as the pile heats up. It is not cheap, but it does last a long time. The roll is 120 feet long and very heavy. I cut my roll into four thirty-foot lengths and that size is much more manageable. I hold the fleece down with old tires still mounted on rims. By using mounted tires, water won’t collect in them creating breeding areas for mosquitos.
The trick to keeping this system affordable is getting the right kind of fan at a good price. The fan I used is an old duct fan. New duct fans cost $800, but used fans can be found for a lot less. My wife saw an ad this past summer for someone selling a used bouncy house fan for $75. The bouncy house fan pushes out a lot more air than the old duct fan, so I probably can build a pile at least twice the size as what I am presently making.
Also, connecting the fan to the pipes is a lot easier. I used a section of an old inner tube. Every time I see a bouncy house at a party, I look at the fans and there are a lot of different styles of bouncy house fans, but they all seem to be a better fit for an aerated compost system than the duct fan I started with.
Jay Armour runs Four Winds Farm in Gardiner, New York. He developed his no-till approach to farming 23 years ago, and is always looking for low cost and innovative ways to improve his model.
.png "The best idea in local farming you’ve never heard of: the “farm stop” with Kathy Sample & Bill Brinkerhoff of Argus Farm Stop")

 The impacts of climate chaos on Astarte Farm have forced us to look for solutions that provide increased long-term resilience in our soil systems, and biochar has shown good promise in moving us toward that goal. Biochar is a paradoxical substance. It is both an ancient agricultural practice developed thousands of years ago in the Amazonian Basin, and at the same time a relatively new approach to enhancing and stabilizing soil fertility.

 Julia Asherman appeared on my radar screen a number of years ago because she was a regular presence at the Southern Sustainable Agriculture Working Group conferences where I’ve spoken many times. Colleagues pointed her out to me as a person to watch because she was tough and smart and she was going to make something of herself as a farmer. We became conference buddies. So, when I had the good fortune to get invited to speak at the Georgia Organics Conference in Athens this winter, I knew right away I wanted to take that opportunity to visit Julia at her place, Rag & Frass Farm in Jeffersonville, Georgia.
 Farmer to Farmer Profile